You don’t need a big budget or a sprawling backyard to create a gorgeous rustic outdoor space. With a little creativity and the junk already headed for your curb, you can turn a cramped urban yard into a lush, character-filled retreat for practically nothing.
These 10 upcycling hacks are built specifically for small spaces under 100 square feet, homeowners who care about the planet, and DIYers who love a good before-and-after reveal.
Why Upcycling Is the Smartest Move for Small Yards
Small yards punish waste. Every inch counts, so every item you bring in needs to earn its spot by being functional, beautiful, or both.
Upcycling delivers exactly that. You source free or nearly free materials, keep usable goods out of landfills, and build a rustic aesthetic that looks intentional rather than budget-forced.
The Real Cost Savings Add Up Fast
Most upcycled garden projects run between $0 and $50 total, according to DIY community forums. Compare that to a single store-bought planter or garden bench, and the math makes itself.
The eco payoff is just as real. Reusing materials like pallets, tires, and glass bottles reduces manufacturing demand for new plastic and metal garden products.
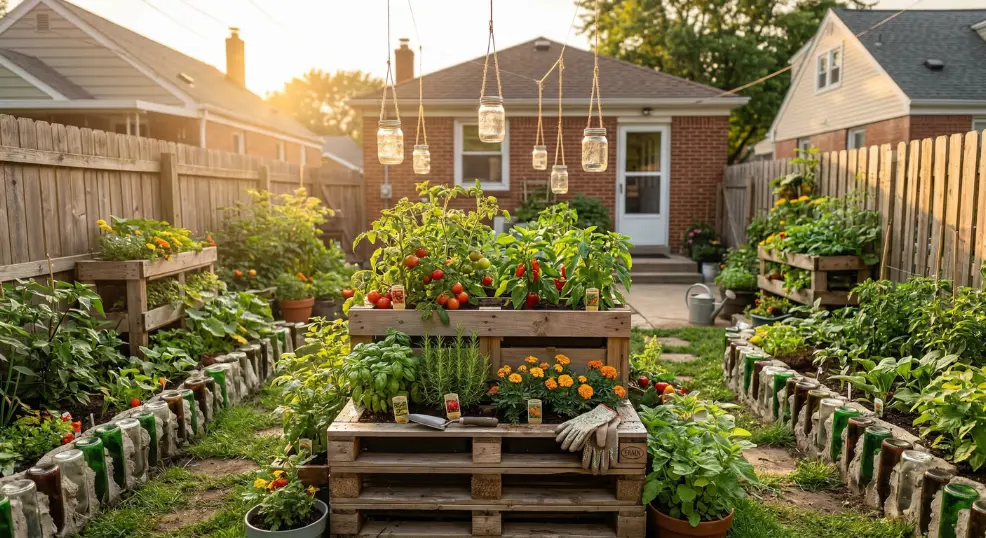
Hack 1: Pallet Vertical Planters
Vertical planting is the single best trick for tiny yards. When you can’t go wide, you go tall, and a single pallet gives you the structure to grow 15 or more plants in a footprint that takes up almost no floor space.
Source pallets from local farms, hardware stores, or online marketplaces. Before you bring one home, check the stamp: “HT” (heat-treated) is safe, but avoid any pallet marked “MB,” which indicates a chemical treatment that can leach into your soil.
How to Build It
Stack two to three pallet sections and secure them directly to an existing fence using heavy-duty screws. Line the interior pockets with landscape fabric (about $5 per roll) to hold soil in place, and drill drainage holes at the bottom of each pocket to prevent root rot. One pallet costs between $0 and $10, and the finished structure can support 15-plus plants growing vertically.
Hack 2: Bottle Brick Borders
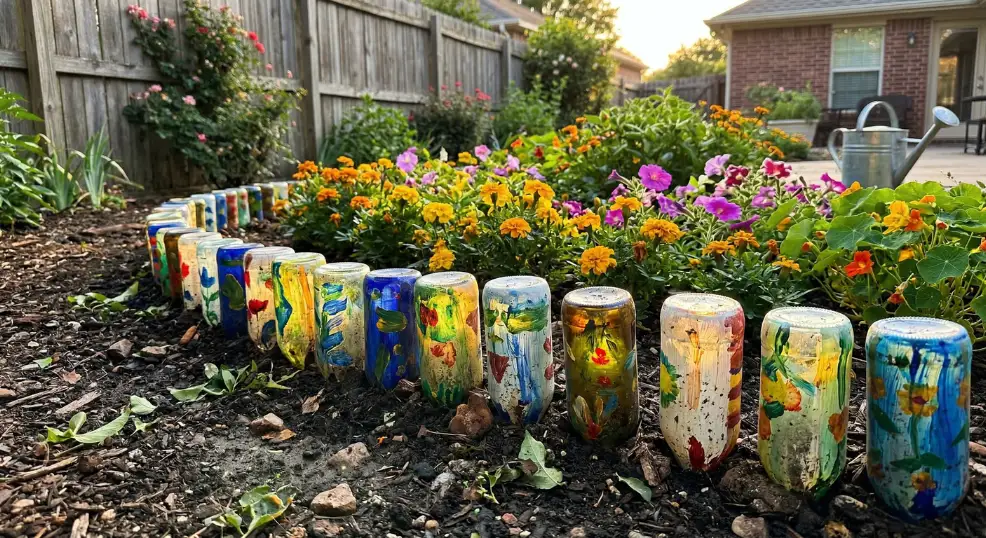
Garden edging defines your beds and gives your yard a finished, intentional look without eating into your square footage. Recycled glass bottles do this job beautifully, and they add a glittering, artisan quality that store-bought plastic edging never achieves.
Collect 50 clear or colored bottles from your recycling bin, or ask neighbors to save theirs. Paint them before installation because UV exposure fades unprotected colors quickly in direct sun.
How to Install It
Dig a narrow trench along your bed edge, about 4 to 5 inches deep. Bury each bottle neck-down, pushing it firmly into the soil, then fill gaps between bottles with sand for a tight, stable line. A single can of spray paint costs around $4, and a properly painted bottle border holds its color for up to two years outdoors.
Hack 3: Tire Swing Benches
Dead corners in a tiny yard are wasted real estate. A tire swing bench transforms that forgotten spot into a functional, charming seat that also becomes the most photographed corner of your outdoor space.
Auto shops and tire centers regularly retire old tires and will often give them away for free. Call ahead and ask, and you will rarely leave empty-handed.
How to Build It
Clean the tire thoroughly, then cut a piece of plywood to fit inside the tire opening as a seat base. Attach the seat with weatherproof hardware, add a cushion or folded burlap for comfort, and hang the whole assembly from a sturdy tree branch using thick natural rope. Plywood runs about $15 per sheet, and the finished bench supports up to 250 pounds. Seal the interior of the tire against standing water to prevent mold buildup.
Hack 4: Mason Jar Lanterns
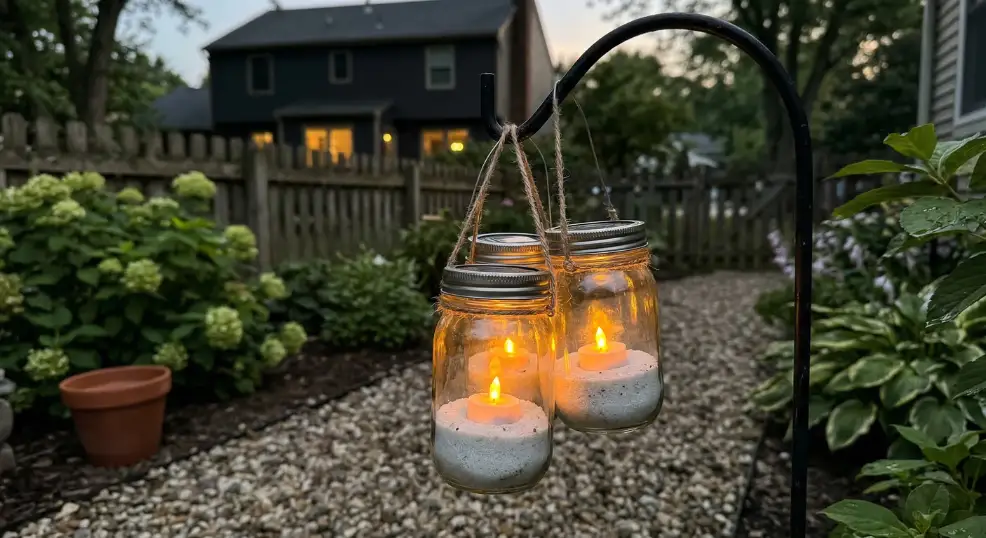
Tiny yards often feel unusable after dark, which is a real loss of living space. Mason jar lanterns solve that problem with soft, warm path lighting that requires zero wiring and costs almost nothing to run.
Reused jars cost as little as $1 each. Solar tea lights charge during the day and deliver six to eight hours of glow each evening without touching your electricity bill.
How to Make Them
Fill each jar with aquarium substrate or clean sand (aquarium substrate mimics the look of fresh snow and reads more polished than plain sand). Drop a solar tea light on top, then create a wire handle by wrapping 18-gauge wire around the jar neck and forming a hanging loop. Suspend your lanterns from a shepherd’s hook above your garden path or cluster them at varying heights along a fence rail for maximum visual impact.
Hack 5: Upcycled Raised Planter Boxes
A raised planter box gives you total control over soil quality in a compact footprint, which is critical when your entire yard might be paved or packed urban clay. Building one from disassembled pallet boards costs next to nothing and produces a sturdy, rustic structure that fits even the narrowest side yards.
Each pallet section holds between 20 and 30 pounds of soil, so a two-pallet planter handles a respectable growing volume. Line the inside with a $2 plastic sheet before filling to retain moisture and prevent early rot.
How to Build It
Disassemble pallets carefully, keeping the boards intact. Assemble four boards into a rectangular frame using exterior screws, then add a second row for height if your crops need it. Seal all cut edges with eco-friendly varnish (about $10 per quart) to dramatically extend the life of the wood. Elevate the finished box off the ground on small pavers to promote drainage and slow the rot process even further.
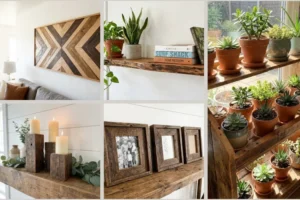
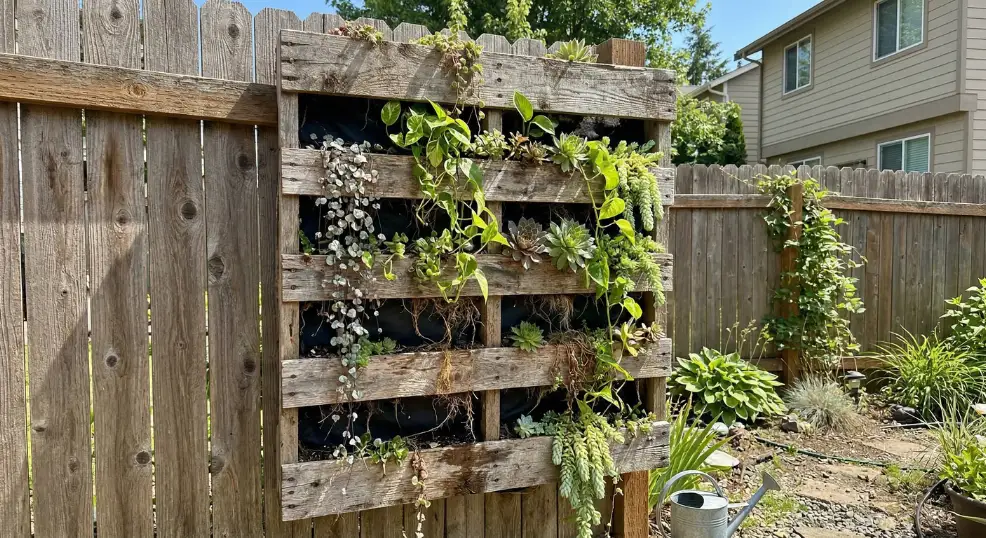
Hack 6: Reclaimed Wood Herb Shelves
When your yard has no room for ground-level herb beds, your walls become your garden. A reclaimed wood shelf mounted to an exterior wall or fence keeps your cooking herbs within arm’s reach without sacrificing a single square foot of floor space.
Pallet boards, old fence slats, or even retired wooden crates all work perfectly here. Sand the surfaces lightly and apply a coat of eco-varnish before mounting to keep the wood stable through rain and sun.
How to Build It
Cut your reclaimed boards to a consistent length (24 inches works well for most exterior walls). Mount two vertical support pieces to your wall using masonry anchors, then attach three horizontal shelves spaced about 10 inches apart. Small terracotta pots sit perfectly on the shelves and add to the rustic tone without any additional cost if you source them secondhand.
Hack 7: Cinder Block Succulent Towers
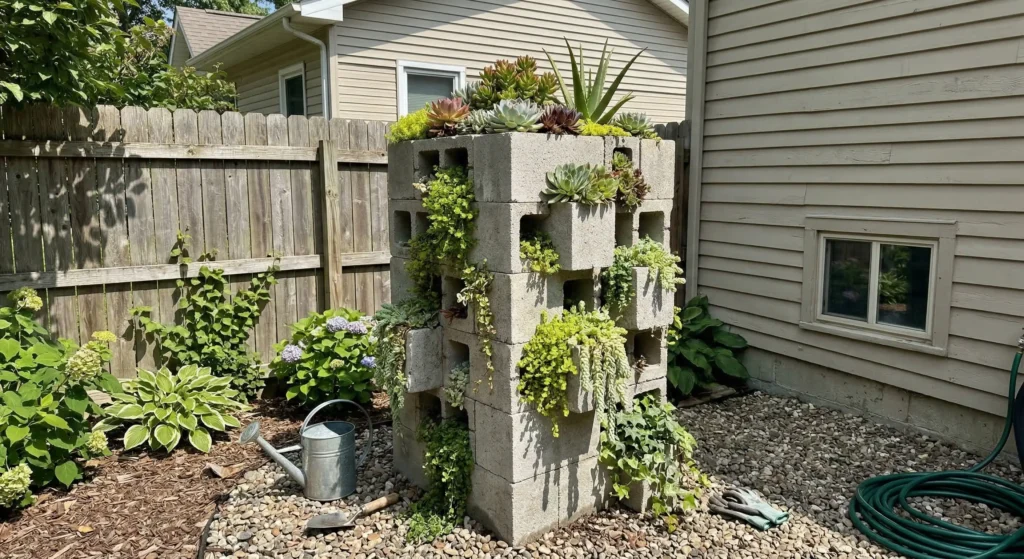
Cinder blocks are heavy, durable, and endlessly stackable, which makes them perfect for building raised planting towers that take up minimal ground space while delivering serious growing capacity. Their hollow cavities become individual planting cells that hold succulents, herbs, or trailing flowers beautifully.
Salvage cinder blocks from demolition sites, construction leftovers, or neighborhood giveaways. Most people are thrilled to have someone haul them away for free.
How to Stack It
Arrange your first layer flat on the ground in an L-shape or square formation to create a stable base. Stack subsequent layers offset from the row below (like traditional brickwork) to increase stability. Fill each cavity with potting mix and plant one succulent or small herb per hole. No mortar or adhesive is required for a tower under four layers tall.
Hack 8: Painted Rock Path Markers
Garden labels sound minor until you are standing in your tiny yard unable to remember which seedling is basil and which is parsley. Painted rock markers solve that problem with a rustic, charming solution that costs absolutely nothing if you collect river rocks or stones from local parks.
Outdoor acrylic paint holds up well through rain and temperature swings. A single small tube covers a dozen rocks and costs about $2 at any craft store.
How to Make Them
Wash and dry your rocks thoroughly before painting. Apply one base coat in a neutral color, let it dry completely (about 20 minutes in direct sun), then paint your plant name or a simple botanical sketch on top. Finish with a thin coat of outdoor Mod Podge or clear acrylic sealer to lock in the design for the full growing season.
Hack 9: Old Ladder Plant Stand
An old wooden step ladder is one of the most efficient upcycling wins for a small yard. Its tiered rungs give you five to six levels of planting space in a footprint smaller than 2 square feet, and the weathered wood look fits perfectly into a rustic garden aesthetic.
Check garage sales, estate sales, or your own storage for retired ladders. A coat of eco-varnish on any cracked or peeling sections is all the prep work you need before moving it outside.
How to Style It
Open the ladder fully and position it in a corner where two fences or walls meet for natural stability. Place taller potted plants on the lower rungs and trail smaller hanging plants from the upper steps. Alternate pot sizes across the levels to create a layered, magazine-worthy display that reads as intentional and designed rather than random.
Pro Tips to Make Every Upcycle Last
You do not need to rebuild your projects every season. A few smart finishing moves protect your materials through rain, heat, and frost.
Apply eco-friendly varnish to all cut or exposed wood surfaces at the start of every season. Use moisture meters to avoid overwatering, which the r/Permaculture community consistently flags as the top cause of upcycled planter failure.
Elevate every planter box and tire bench off the ground on small pavers or bricks to keep water from pooling underneath. These small steps double the functional lifespan of your projects without adding significant cost or effort.