15 Genius Tin Can Storage Hacks to Declutter Your Small Space
Staring at your cramped apartment buried under makeup brushes, charging cables, and cooking spices? Before you shell out money for fancy organizers, raid your recycling bin. Those empty tin cans gathering dust are about to become your secret weapon for reclaiming every centimeter of space.
Whether you’re a renter who can’t drill holes or a parent drowning in scattered supplies, these genius hacks transform recycled food cans into eco-friendly storage in under 15 minutes of active work. No special tools required—just creativity and a little paint. Let’s turn 90% of your household waste into organized bliss.
At a Glance
Difficulty Level: Beginner-friendly (no power tools needed)
Average Cost per Project: Under $2 (assuming you have basic glue/paint)
Perfect For: Small space organization, small kitchen owners, desk workers in tight spaces, eco-conscious crafters seeking zero-waste solutions
15 Creative Tin Can Ideas to Try
1. DIY Magnetic Pencil Tower for Vertical Desks
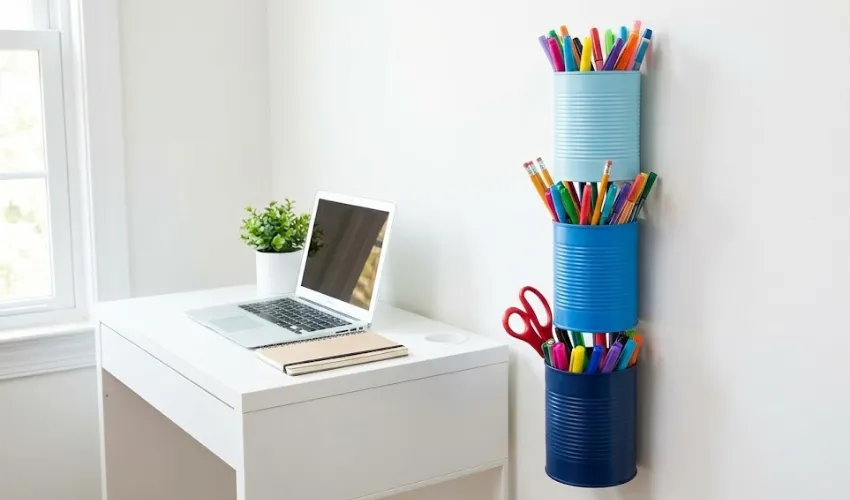
Stack three graduated-size cans and glue strong magnets to their backs—instant vertical storage that clings to any metal surface or magnetic board. Paint them in ombre shades to match your workspace aesthetic while keeping markers, scissors, and rulers within arm’s reach without stealing precious desk real estate.
This hack beats bulky plastic organizers because it grows with your needs. Add or remove cans as your supply collection changes, and the magnetic backing means you can reposition them daily without leaving residue on rented walls.
Smooth any sharp edges with a metal file before decorating, then seal with clear acrylic spray for a professional finish that lasts years.
2. Under-Sink Cleaner Caddy with PVC Frame
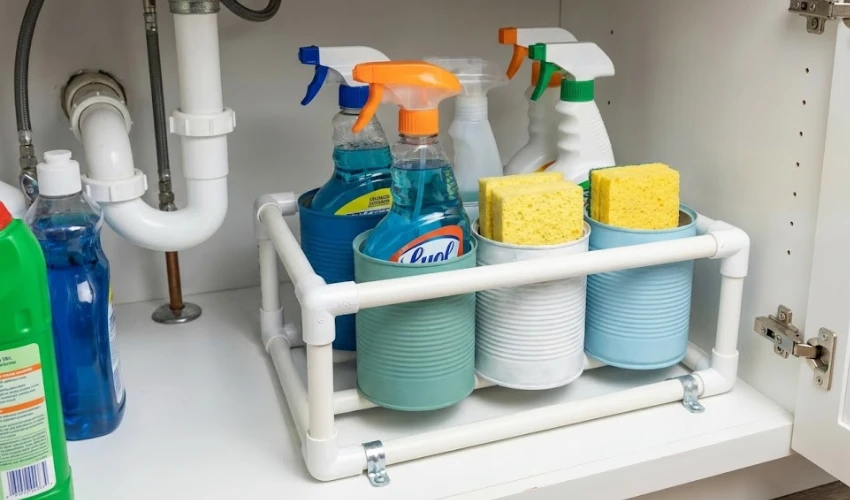
Cut a 30cm length of PVC pipe (or ask your hardware store to cut it for you) and nestle four cans inside to create a rolling caddy that slides under tight sink spaces. The pipe frame keeps cans stable while you store dish soap, scrub brushes, and cleaning sprays in separate compartments that won’t tip over when you grab one item.
Unlike fixed shelves that waste vertical space, this mobile unit follows the contours of your plumbing. Attach furniture gliders to the bottom and it transforms into a pull-out system that makes every bottle visible in seconds.
Wrap the PVC in washi tape or fabric scraps to hide industrial vibes and match your bathroom palette.
3. Space-Saving Vertical Spice Rack for Kitchen Nooks
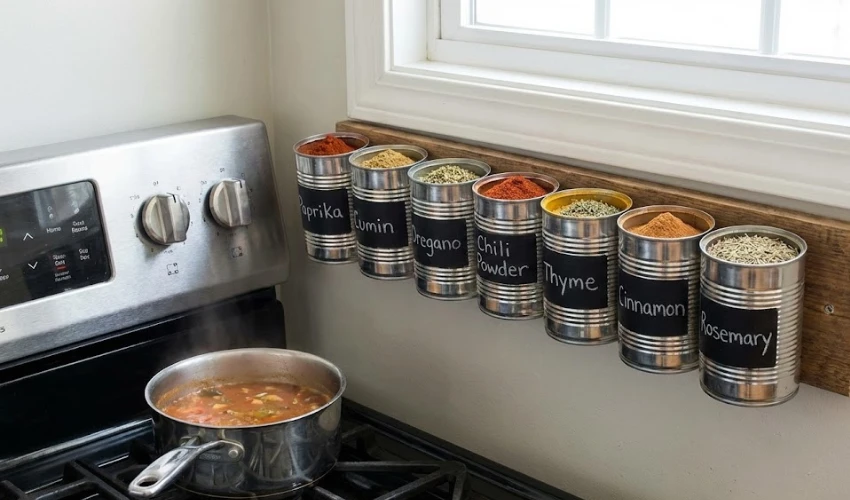
Mount cans sideways on a salvaged wood plank using strong adhesive strips approved for renters—no drilling required. This vertical storage idea turns a 15cm wall sliver beside your stove into a spice library where every jar stays visible and grabbable while cooking.
The open-front design beats drawer chaos because you identify cumin from coriander at a glance. Paint the can rims with chalkboard paint and label each opening with chalk markers that wipe clean when you refill.
Hang the entire board on removable command hooks rated for 2kg, ensuring your security deposit stays intact while maximizing dead wall space other organizers ignore.
4. Floating Bathroom Shelf for Cosmetics

Line up painted cans on a narrow floating shelf above your sink to corral makeup brushes, cotton rounds, and bobby pins into separate homes. The individual compartments prevent the avalanche effect when you grab one item, and the elevated placement keeps counters clear for actual grooming tasks.
This setup outperforms acrylic trays because tin naturally prevents products from sliding around. Choose cans with rolled edges for safety, then wrap the exteriors in decorative contact paper that matches your tile without committing to permanent changes.
Add a small LED strip behind the shelf for Instagram-worthy lighting that doubles as a nightlight for 3am bathroom trips.
5. Desktop Cable Corral with Weighted Base
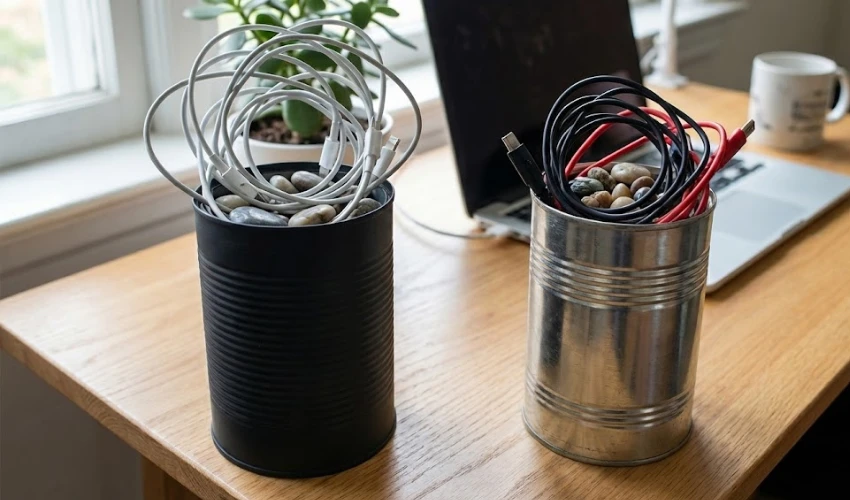
Fill cans halfway with aquarium gravel or decorative stones to create weighted holders that won’t tip when you yank phone chargers. Designate one can for USB cables, another for headphones—suddenly your desk drawer stops eating every cord you own.
The weight solves the frustration of lightweight organizers that topple during cable retrieval. Paint the cans in metallic gold or copper for a grown-up look that doesn’t scream “recycled trash” during video calls.
Punch drainage holes in the bottom if using the stones method, preventing moisture buildup that could rust the interior over humid months.
6. Modular Utensil Divider for Cramped Drawers
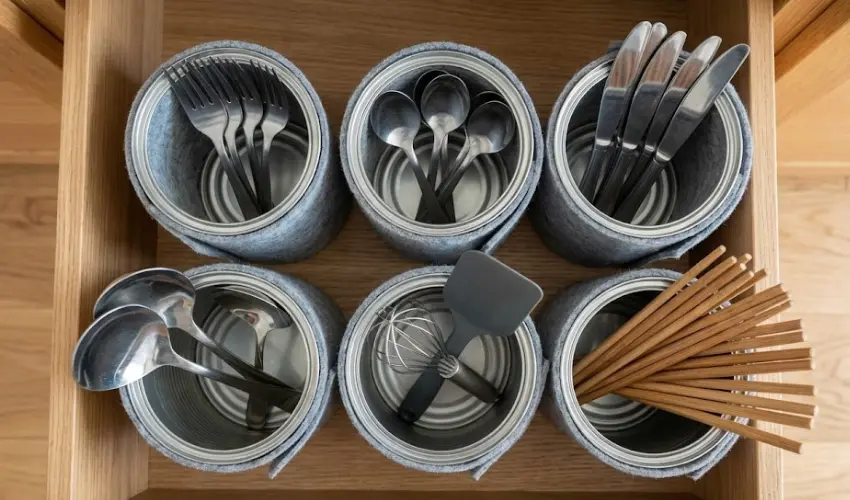
Drop six same-height cans into your silverware drawer to create budget kitchen organizers that actually fit your utensil collection. Unlike plastic trays with fixed compartments, this system adapts when you add new serving spoons or when chopsticks need their own space.
Wrap each can in felt fabric secured with fabric glue to prevent scratching drawer bottoms and muffling the metallic clang when you toss forks inside. The soft lining also grips drawer surfaces, stopping the entire setup from sliding forward every time you open it.
Choose cans that stand 1cm shorter than your drawer depth so lids close smoothly without catching on rims.
7. Countertop Herb Garden with Drainage
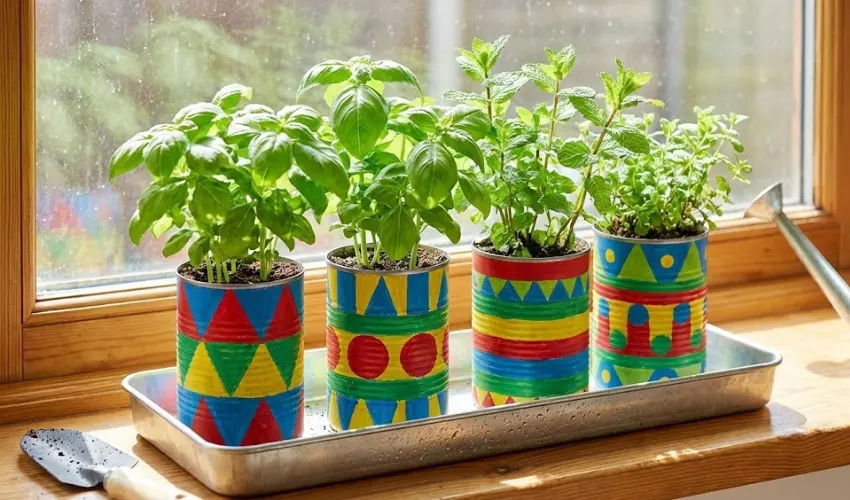
Punch three drainage holes in can bottoms using a simple nail and hammer on a wood scrap, then fill with potting soil to grow compact herbs like basil and thyme. Set cans in a shallow tray to catch excess water—now your 20cm of counter space beside the window becomes a fresh ingredient station.
This beats store-bought planters because tins are free and perfectly sized for single-harvest herbs. Paint the exteriors with outdoor acrylic paint in bold patterns that bring joy to daily cooking while the metal protects roots from temperature swings.
Rotate cans weekly so all sides get equal sunlight, and snip leaves from the top to encourage bushier growth that lasts months.
8. Stacked Snack Station for Kids’ Reach
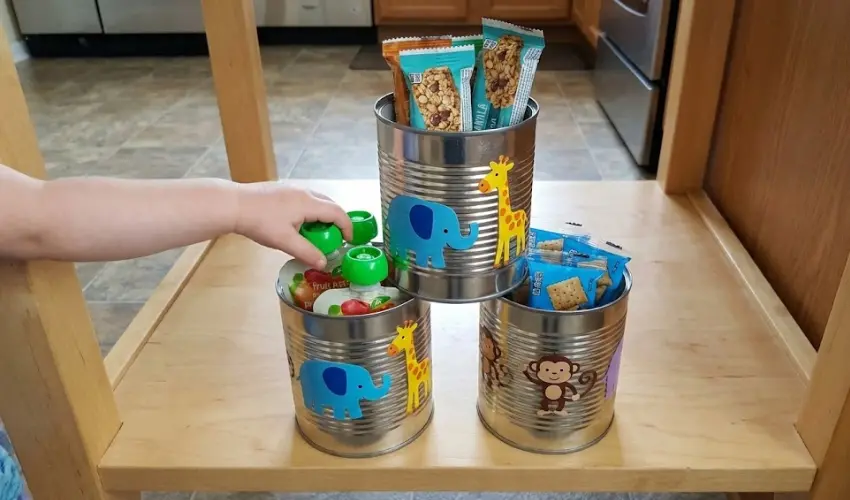
Glue three graduated cans into a pyramid shape using heavy-duty adhesive and place on a low shelf where kids can self-serve snacks. Each tier holds a different food type, teaching organization while reducing “I’m hungry” interruptions during your work calls.
The stable base prevents toppling during enthusiastic snack grabs. Decorate with vinyl stickers of animals or vehicles that toddlers love, turning refill time into a matching game that builds vocabulary.
Choose cans with smooth rolled rims to protect little fingers, and avoid anything that held acidic foods to prevent lingering metallic tastes.
9. Bathroom Counter Makeup Brush Drying Rack
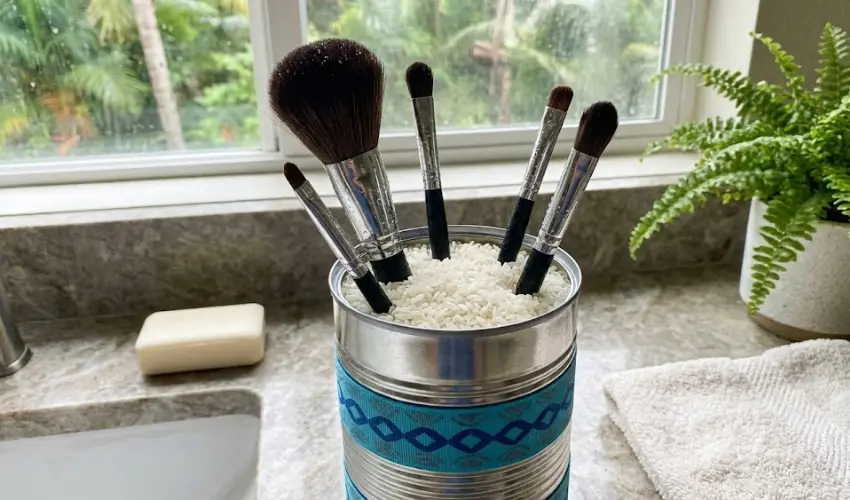
Fill a tall can with uncooked rice or coffee beans and insert freshly washed makeup brushes bristle-up to dry overnight. The grains absorb moisture while holding brushes upright, preventing mildew that ruins expensive bristles when they dry flat in drawers.
This technique outperforms towel drying because airflow reaches all sides of the brush head. Use a decorative ribbon to wrap the can exterior, hiding the plain metal while matching your bathroom’s color scheme.
Replace the rice monthly if it absorbs too much humidity, or use dried chickpeas that last longer in tropical climates like Semarang’s year-round warmth.
10. Rolling Pin and Kitchen Tool Tower
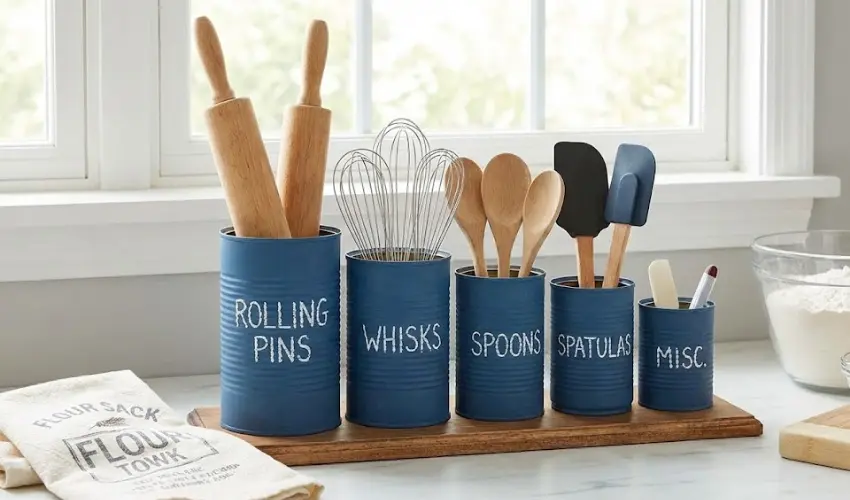
Arrange cans in ascending height like organ pipes and glue them to a wooden base board to create a tool tower for long utensils. The varied depths accommodate everything from whisks to rolling pins without that game of “dig through the drawer until you find it” you play every baking session.
The upright storage saves 70% more space than laying tools in drawers. Paint the cans in chalk paint and label each opening with its designated tool, training family members to return items to the correct spot.
Seal the wood base with polyurethane if placing near the sink, protecting against water damage from wet hands grabbing tools mid-recipe.
11. Desktop Plant Propagation Station
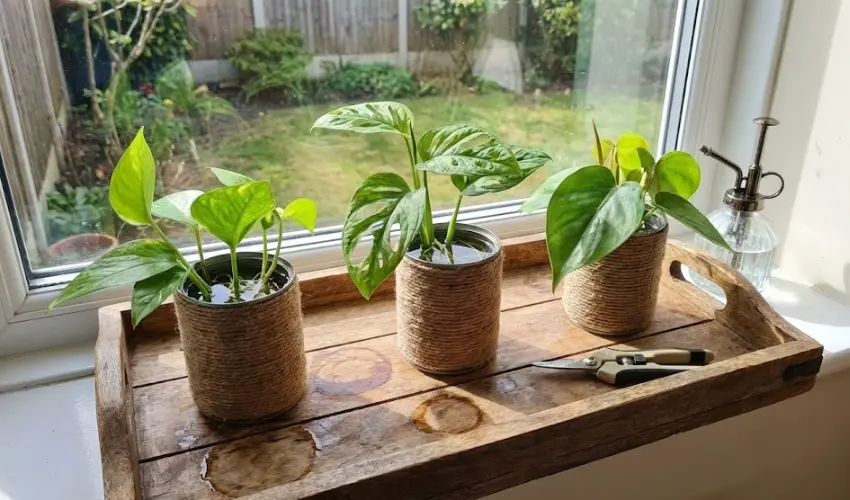
Use tiny tuna or cat food cans as water vessels for propagating plant cuttings from larger houseplants. The narrow openings support stems perfectly while roots develop, and the compact size fits on windowsills too small for traditional propagation setups.
This method beats using random jars because the uniform can sizes create a cohesive display. Wrap cans in twine or jute cord secured with hot glue for a natural aesthetic that complements greenery while hiding any label residue.
Change water weekly to prevent algae growth, and transfer cuttings to soil once roots reach 5cm for the highest survival rate in new pots.
12. Upcycled Toy Car Parking Garage
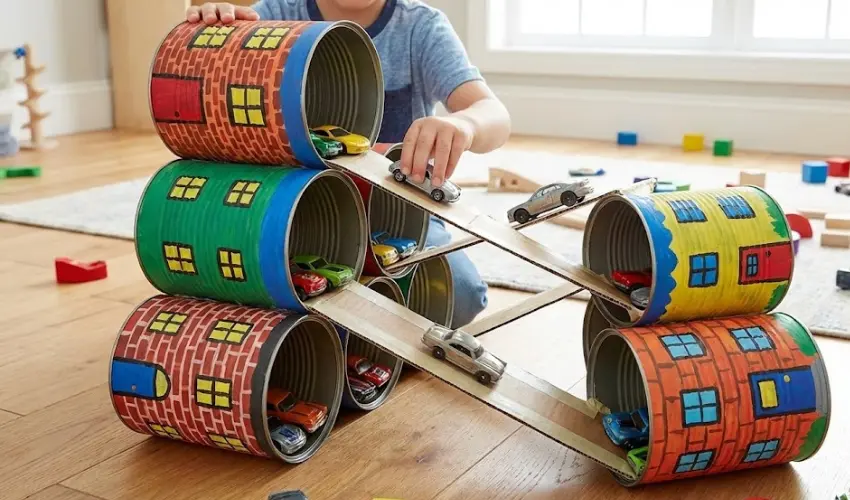
Glue cans on their sides and connect them with cardboard ramps to build a multi-level parking garage that stores toy cars while doubling as a playset. Paint windows and doors on the can bodies to create cityscape buildings—suddenly cleanup becomes part of the game.
This design beats plastic bins because it engages kids’ imagination while organizing. Use non-toxic tempera paint and let children help decorate their “buildings,” creating ownership that makes them more likely to put cars away.
Reinforce cardboard ramps with packing tape on the underside so they survive months of enthusiastic play before needing replacement.
13. Craft Supply Carousel
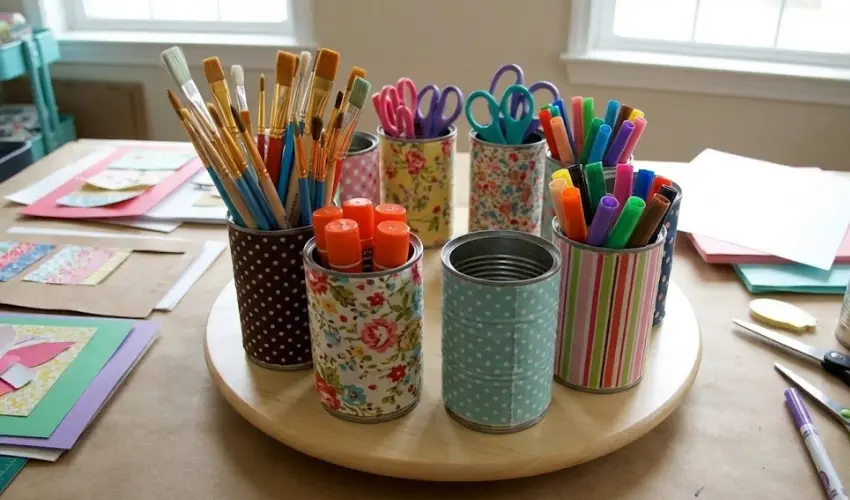
Mount cans in a circle on a lazy Susan turntable to create a rotating craft station that spins supplies within reach without standing up. Each can holds a different tool type—paint brushes, scissors, glue sticks—making art projects flow faster when everything’s visible and accessible.
The rotation solves the problem of supplies trapped at the back of shelves. Cover cans with fabric scraps in complementary patterns, turning functional storage into decor that brightens your craft corner.
Secure cans to the turntable with strong double-sided foam tape rated for 1kg per strip, ensuring they don’t topple during enthusiastic spins.
14. Charging Station with Cord Management
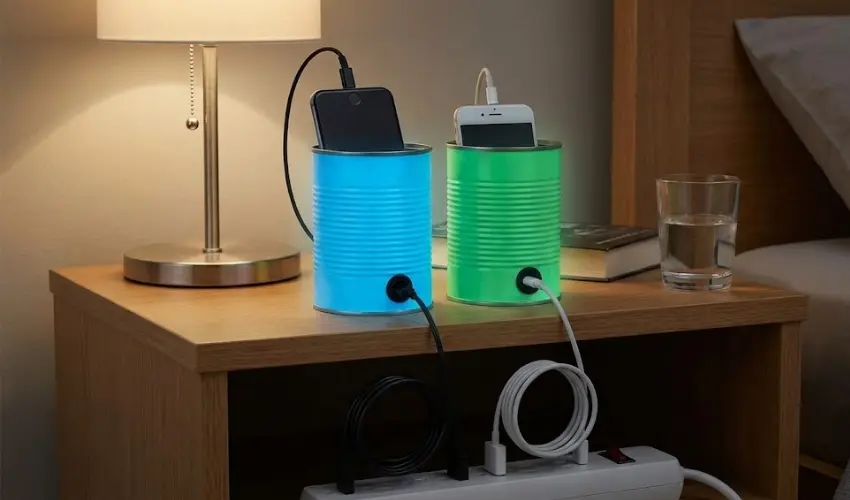
Punch cable-width holes near the bottom of two cans and thread charging cables through so the plugs live inside while cords emerge neatly. Place phones or tablets on top to charge—the weighted cans prevent that midnight crash when your device slides off the nightstand.
This setup eliminates the tangle of six different cables fighting for space on your nightstand. Paint can exteriors with glow-in-the-dark paint for a functional nightlight that helps you find your phone at 2am without turning on blinding overhead lights.
Use a rubber grommet around each punched hole to protect cable insulation from sharp metal edges that could fray wires over time.
15. Wall-Mounted Mail Sorter
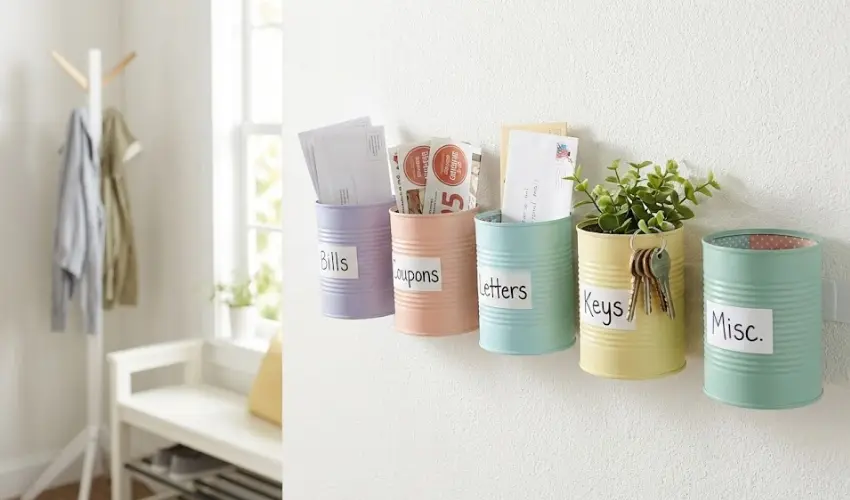
Mount cans sideways on your entryway wall using removable adhesive strips to create mail slots that sort incoming paper the moment you walk through the door. Label each can by category—bills, coupons, letters to answer—so junk mail never mixes with important documents again.
The visibility beats closed filing systems because you see what needs attention at a glance. Line can interiors with decorative scrapbook paper in coordinating colors that make even mundane mail management feel intentional and organized.
Position the sorter at arm height beside your door so dropping mail becomes automatic, training the household to sort instead of pile papers on the kitchen counter.
Final Thoughts
These fifteen hacks prove that small spaces don’t need expensive solutions—just a little creativity and empty cans you’d normally recycle. Start with the project that helps your decluttering journey today, and watch how organizing one corner motivates you to transform the next.
Explore our Upcycled Crafts section for more zero-waste inspiration, or search ‘tin can crafts’ above to discover beginner-friendly tutorials that turn trash into treasure.