Let’s talk about something that’s been giving your wallet a workout lately—those monthly utility bills that seem to climb higher every season. If you’ve ever opened an electricity or gas bill and felt your stomach drop, you’re definitely not alone. The good news? You don’t need to be an electrician or hire an expensive contractor to make a real difference in your energy costs.
Think of your home as a bucket with tiny holes all over it. Your heating and cooling systems are constantly trying to fill that bucket, but energy keeps leaking out through gaps around doors, outdated light bulbs, and appliances that silently sip power even when you think they’re off. The beauty of DIY energy saving tips is that you can patch those holes yourself, often with materials you can grab from your local hardware store and tools you already own.
We’re living in an era where sustainability isn’t just a buzzword—it’s a practical necessity that benefits both your bank account and the planet. Whether you’re a renter working with limitations or a homeowner ready to invest in your property, there are energy saving DIY projects suited to every skill level and budget. From the absolute beginner who’s never held a caulking gun to the weekend warrior who loves tackling home improvement challenges, you’ll find actionable solutions here.
In this guide, we’ll walk through proven strategies that real people are using to cut their utility bills by hundreds of dollars annually. We’ll explore everything from quick wins you can accomplish this weekend to slightly more involved projects that deliver impressive long-term savings. Ready to transform your home into an energy-efficient sanctuary while keeping more money in your pocket? Let’s dive in.

Understanding Your Home’s Energy Profile
Before we jump into specific projects, let’s take a moment to understand where your energy dollars are actually going. It’s like trying to stick to a budget without knowing what you’re spending—you need a baseline.
Check out our : Top 20 Money-Saving DIY Hacks to Slash Your Bills
The Big Energy Users in Your Home:
Your heating and cooling systems typically account for 40-50% of your total energy consumption. That’s right—nearly half of your utility bill goes toward keeping you comfortable temperature-wise. Water heating comes in second, usually claiming around 15-20% of your energy budget. Lighting, appliances, and electronics make up the remaining portion, though phantom power drain (we’ll get to that sneaky culprit later) can add surprisingly significant costs.
Think about conducting a DIY energy audit checklist for homes before you start any projects. Walk through each room with a critical eye. Feel around windows and doors for drafts on a windy day. Notice which rooms feel consistently colder or warmer than others. Check your attic insulation—if you can see the ceiling joists, you probably need more. These observations will help you prioritize which DIY energy saving tips will deliver the biggest bang for your buck.
Many utility companies offer free or discounted energy audits, and some even provide free materials like LED bulbs or weatherstripping. Take advantage of these programs—they’re essentially free money on the table. Understanding your starting point helps you measure success and keeps you motivated when you see those utility bills start dropping.
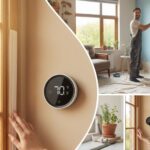
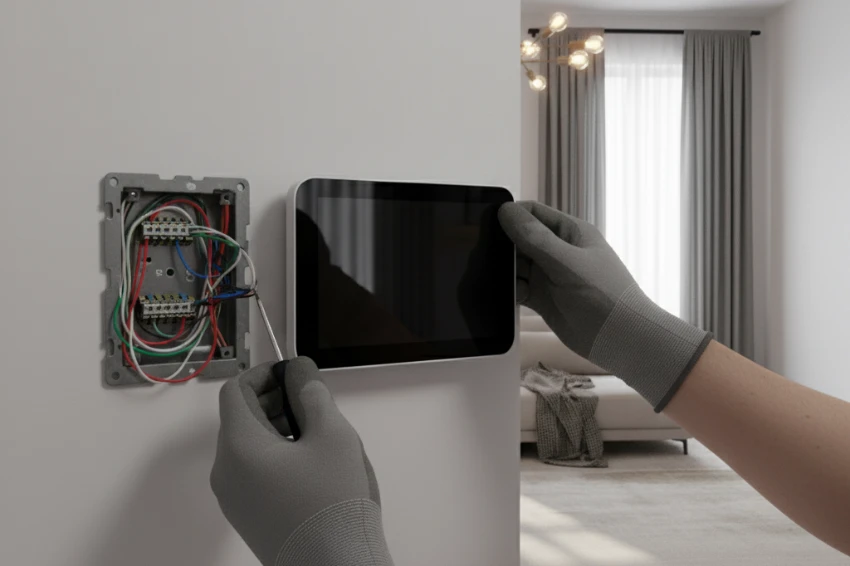
Smart Thermostat Installation: Your New Best Friend
Let’s start with one of the most impactful changes you can make: upgrading to a smart thermostat. I know what you’re thinking—”smart” sounds complicated and expensive. But here’s the truth: modern smart thermostats are designed for DIY installation, and they typically pay for themselves within a year through energy savings.
Why Smart Thermostats Work
Traditional thermostats are like driving a car with your eyes closed, making turns based on a predetermined schedule. Smart thermostats actually learn your habits and adjust accordingly. They know when you’re home, when you’re away, and when you typically go to bed. Some can even detect when you’re approaching home using your phone’s location and start warming or cooling the house just in time.
The best smart thermostat for DIY installation depends on your existing system, but popular options like the Google Nest, Ecobee, and Honeywell Home T9 are all designed with homeowners in mind. Most installations take 30-45 minutes and require nothing more than a screwdriver and the ability to follow color-coded wiring instructions.
Installation Steps:
First, take a photo of your current thermostat’s wiring before disconnecting anything—this is your safety net. Turn off the power to your heating and cooling system at the circuit breaker (non-negotiable for safety). Remove your old thermostat and match the wires to your new smart thermostat’s labeled terminals. Most systems use standard color coding: red for power, white for heating, yellow for cooling, and green for the fan.
Mount the new base plate, connect the wires, snap on the display, and restore power. The setup wizard walks you through connecting to Wi-Fi and customizing your preferences. Within a few days, the thermostat begins learning your patterns and optimizing your energy use automatically.
The energy savings from smart thermostat installation range from 10-23% on heating and cooling costs according to independent studies. For an average household spending $1,500 annually on heating and cooling, that’s $150-$345 back in your pocket every year. Not bad for an afternoon’s work.
DIY Home Insulation That Actually Works
Insulation might not be glamorous, but it’s absolutely foundational to home energy efficiency. Think of insulation as your home’s winter coat—without it, you’re constantly cranking up the heat to compensate for what’s escaping.
Attic Insulation: The Low-Hanging Fruit
Heat rises, which means your attic is the number one escape route for warm air in winter. If your attic insulation is less than 10-14 inches deep, you’re leaving money on the table. The good news? Adding attic insulation is one of the most straightforward energy saving DIY projects you can tackle.
For how to save energy with DIY insulation, fiberglass batts or blown-in cellulose are your main options. Batts are easier for DIYers—you simply unroll them between the joists, ensuring they fit snugly without gaps. Blown-in insulation provides better coverage around obstacles but requires renting equipment. Either way, aim for an R-value (insulation effectiveness rating) of R-38 to R-60, depending on your climate.
Safety first: Wear long sleeves, gloves, a dust mask (N95 rated), and eye protection. Fiberglass isn’t dangerous, but it’s incredibly itchy and irritating. Work in the morning when attics are cooler, and never step between joists—one wrong step and you’ll end up in the room below.
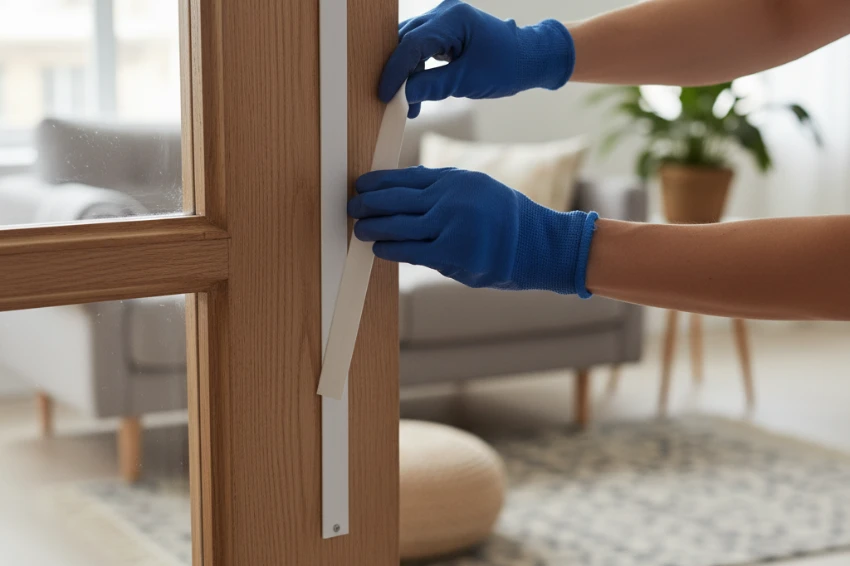
DIY Window Insulation Kits
Windows are beautiful traitors—they let in light while also letting energy escape. DIY window insulation kits use a plastic film that shrinks tight when you apply heat from a hair dryer, creating an invisible barrier that significantly reduces heat loss.
These kits cost $10-15 per window and take about 15 minutes each to install. Clean the window frame, apply double-sided tape around the perimeter, press the plastic film onto the tape, and use a hair dryer to shrink it smooth. The film is nearly invisible when done properly, and you’ll immediately feel the difference in drafty rooms.
For a more permanent solution, consider cellular shades or insulated curtains. While not strictly DIY in the construction sense, installing them yourself saves installation fees and they provide excellent insulation value, especially when paired with window films.
Here’s a quick comparison of insulation methods:
| Insulation Method | Cost (DIY) | Difficulty | Annual Savings | Payback Period |
|---|---|---|---|---|
| Attic insulation (batts) | $300-600 | Moderate | $200-400 | 1-2 years |
| Window insulation kits | $50-150 | Easy | $50-100 | 6-12 months |
| Weatherstripping doors | $20-40 | Easy | $30-60 | 4-8 months |
| Pipe insulation | $30-80 | Easy | $40-80 | 6-10 months |
Draught Proofing DIY: Sealing the Invisible Leaks
Here’s a sobering thought: if you added up all the tiny gaps around your doors, windows, and other openings, it would be equivalent to leaving a window wide open 24/7. Draught-proofing is cheap DIY air sealing for home that delivers immediate, noticeable results.
DIY Draught Excluders for Doors and Windows
Start with the smoke test—literally. On a windy day, light an incense stick and hold it near the edges of doors and windows. Watch the smoke. If it wavers or gets blown horizontally, you’ve found a leak. Mark these spots with painter’s tape.
For doors, install door sweeps at the bottom (takes about 10 minutes per door with just a screwdriver). These flexible strips create a seal between the door and threshold, blocking drafts while still allowing the door to open and close smoothly. For the sides and top of doors, use adhesive foam weatherstripping. Clean the door frame thoroughly, measure carefully, and press the foam tape into place. It compresses when the door closes, creating an airtight seal.
Windows need different treatment depending on whether they’re operational or decorative. For windows you open regularly, V-strip (tension seal) weatherstripping works beautifully. For windows you never open, rope caulk offers a removable solution that you can press into gaps and remove in spring without damage.
Advanced Air Sealing
Once you’ve tackled the obvious spots, look for these sneaky culprits: electrical outlets on exterior walls (install foam gaskets behind outlet covers), recessed lighting fixtures (seal with fire-rated caulk), baseboards where they meet exterior walls, and wherever different building materials meet.
A few tubes of caulk ($5-8 each) and an afternoon of detective work can reduce your heating and cooling needs by 15-20%. That’s a pretty fantastic return on investment.
Energy Efficient Lighting Upgrades That Pay for Themselves
Remember when your parents told you to turn off lights when leaving a room? They were onto something, but with modern lighting technology, we can do so much better than just flipping switches.
The LED Revolution
Energy-saving LED light bulbs DIY installation is probably the easiest win in this entire article. LEDs use 75% less energy than traditional incandescent bulbs and last 25 times longer. Do the math: if you’re still using incandescent bulbs, you’re essentially paying 4-5 times more for lighting than necessary.
Replacing bulbs is obviously straightforward—unscrew the old, screw in the new. But here’s what most people don’t know: LED technology has come incredibly far. You’re no longer stuck with harsh, institutional lighting. Modern LEDs come in various color temperatures from warm (2700K, mimicking incandescent) to daylight (5000K, energizing and bright). Choose warmer tones for living areas and bedrooms, cooler tones for workspaces and kitchens.
Strategic Lighting Design
Beyond bulb swaps, think about lighting strategically. Task lighting uses less energy than lighting entire rooms. A well-placed reading lamp uses a fraction of the energy compared to overhead lighting. Install dimmer switches (fairly simple DIY project) to reduce energy use and extend bulb life even further.
Consider motion-sensor switches for rooms like bathrooms, pantries, and garages where lights are frequently left on accidentally. These sensors turn lights off automatically after detecting no movement for a set period—basically a foolproof way to ensure lights aren’t wasting energy.
Outdoor Lighting Intelligence
Exterior lighting is essential for safety and security, but it doesn’t need to run all night. Solar-powered path lights eliminate electrical costs entirely. For porch and security lighting, install photocell sensors that automatically turn lights on at dusk and off at dawn, or combine motion sensors with LED fixtures for maximum efficiency.
The total investment for converting a typical home to LED lighting runs $100-200, with annual savings of $100-150. You’ll break even within the first year and enjoy reduced costs for years to come.

Reduce Heating Bills DIY: Radiator and HVAC Hacks
Your heating system works hard during winter months, but simple DIY tricks can make it work smarter, not harder.
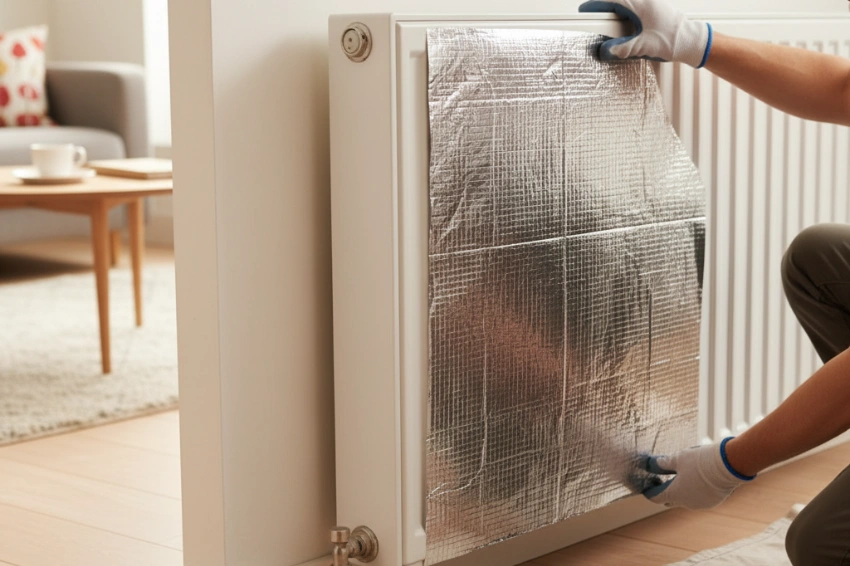
DIY Radiator Foil Installation
Here’s a clever trick that costs almost nothing: installing reflective foil behind radiators. Heat radiates in all directions, including toward the wall behind the radiator—essentially heating the exterior of your home. Reflective foil redirects that heat back into the room where you actually want it.
You can purchase specialized radiator reflector panels or make your own using heavy-duty aluminum foil and cardboard. Cut a piece of cardboard to fit the space behind your radiator, cover one side with foil (shiny side out), and slide it behind the radiator. This simple modification can improve radiator efficiency by 10-15%.
HVAC Filter Maintenance
This one’s so simple it barely qualifies as DIY, yet most homeowners neglect it: change your HVAC filters regularly. A clogged filter forces your system to work harder, using more energy and shortening its lifespan. Check filters monthly and replace them every 1-3 months depending on usage and whether you have pets.
Set a recurring reminder on your phone—seriously, do it right now. A $5 filter change can prevent hundreds in unnecessary energy costs and thousands in potential repair bills.
Ceiling Fan Direction
Ceiling fans aren’t just for summer. In winter, run them clockwise on low speed to gently push warm air that’s collected near the ceiling back down into the living space. In summer, run them counterclockwise to create a cooling breeze. This simple switch (usually a small toggle on the fan’s motor housing) can reduce heating and cooling needs by 8-10%.
Energy Efficient Kitchen DIY Ideas
Your kitchen is surprisingly energy-hungry, but it’s also full of opportunities for smart savings.
Refrigerator Optimization
Your fridge runs 24/7, making it one of your home’s biggest energy consumers. Start with the basics: clean the condenser coils (those dusty things on the back or bottom) twice a year. Dusty coils make the compressor work harder, using significantly more energy. Five minutes with a vacuum attachment twice a year can reduce refrigerator energy consumption by 5-10%.
Check your refrigerator’s temperature settings. The FDA recommends 37°F for the fridge and 0°F for the freezer—colder than necessary wastes energy without adding food safety benefits. Verify with an appliance thermometer.
Make sure door seals are intact by closing a dollar bill in the door. If you can easily pull it out, the seal needs replacing. New door gaskets cost $50-100 and save considerably more in prevented energy waste.
Energy Saving Tips for Electric Water Heaters
Water heating is your second-largest energy expense. Insulate your water heater with a special insulation blanket ($20-30) if it’s warm to the touch—heat you can feel is heat you’re paying for that’s escaping. Lower the temperature setting to 120°F; anything higher is unnecessary for most household uses and scalds unnecessarily while wasting energy.
Insulate the first 6 feet of hot and cold water pipes leading from the water heater using foam pipe insulation. This simple project costs $10-20 and prevents heat loss as hot water travels through your home.
Install low-flow aerators on faucets ($3-10 each) to reduce hot water consumption without noticing any difference in water pressure. The savings compound because you’re paying less both to heat the water and for the water itself.
Efficient Cooking Practices
Use lids when cooking—water boils faster, food cooks quicker, and you use less energy. Match pot sizes to burner sizes so heat isn’t wasted. Microwaves, pressure cookers, and toaster ovens use significantly less energy than full-size ovens for small meals. When you do use the oven, cook multiple items at once to maximize efficiency.
Keep your oven clean—buildup reduces efficiency. And here’s a tip many people don’t know: turn off the oven a few minutes before food is done and let residual heat finish the cooking. Works beautifully for casseroles, roasted vegetables, and baked goods.
Phantom Power Energy Saving: Stopping the Silent Drain
Let me introduce you to a sneaky little thief that’s probably costing you $100-200 annually: phantom power, also known as vampire power or standby power.
Understanding Phantom Power
Phantom power refers to electricity consumed by devices when they’re turned off but still plugged in. Your TV, computer, printer, phone chargers, microwave (that clock display), coffee maker, and countless other devices are drawing small amounts of power constantly. Individually insignificant, collectively substantial.
Studies show phantom power accounts for 5-10% of residential electricity use. For a household spending $1,500 annually on electricity, that’s $75-150 literally doing nothing.
How to Unplug Phantom Devices at Home
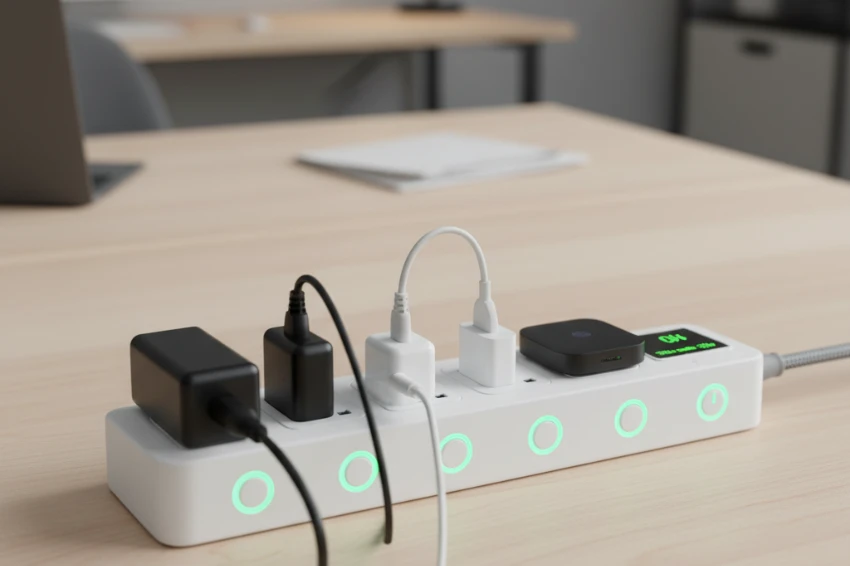
The most straightforward solution: unplug devices you’re not using. But let’s be realistic—nobody wants to crawl behind the TV stand daily. Instead, use smart power strips that cut power to multiple devices with a single switch.
Advanced power strips automatically cut power to peripheral devices when the main device turns off. For example, when you turn off your TV, the power strip automatically cuts power to your cable box, gaming console, and sound system. These strips cost $20-40 and immediately start saving money.
Group devices logically: entertainment center, home office, kitchen appliances. Place power strips in accessible locations so you can easily switch them off. For devices that need constant power (modems, routers, DVRs), use separate outlets.
Strategic Unplugging
Focus on the biggest offenders: desktop computers and monitors, gaming consoles, TVs and cable boxes, printers and scanners, audio equipment, and phone chargers. That phone charger plugged in without a phone attached is literally burning money, albeit small amounts.
Bathroom and kitchen appliances with digital displays—electric toothbrushes, coffee makers, microwaves—all draw phantom power. Consider unplugging them when not in use or keeping them on power strips you can easily control.
Energy Saving Appliances DIY: When to Upgrade
Sometimes the most efficient DIY move is knowing when DIY isn’t the answer—when upgrading to modern, energy-efficient appliances makes more financial sense than maintaining old energy hogs.
The Upgrade Decision Matrix
If your refrigerator, washer, dryer, or dishwasher is more than 10-15 years old, it’s likely using significantly more energy than modern Energy Star certified models. A 20-year-old refrigerator can use 4 times more electricity than a current efficient model.
Calculate the math: Look up your appliance’s energy consumption (check the yellow EnergyGuide label or search the model online). Compare it to modern equivalents. If the annual energy savings exceed 20-30% of the appliance’s cost, upgrading makes economic sense even if your current appliance still works.
Installation DIY Opportunities
When you do upgrade, save on installation costs by doing the setup yourself where possible. Washing machines, dryers, and dishwashers typically require basic hookups you can handle with common tools and YouTube tutorials. Refrigerators just need proper clearance and leveling.
Leave gas appliances, major electrical work, and water heater installations to professionals—these require permits and proper expertise for safety reasons.
Energy Star Matters
Always look for the Energy Star certification. These appliances meet strict efficiency guidelines set by the EPA and typically use 10-50% less energy than standard models. The slightly higher upfront cost pays back through lower utility bills, often within 2-4 years.
Appliance-Specific Tips:
For washing machines, cold water washing saves tremendous energy (90% of a washer’s energy goes to heating water). Modern detergents work perfectly in cold water. Front-loading washers use less water and energy than top-loaders.
Dishwashers are actually more water-efficient than hand washing if you run full loads and skip the heated dry cycle—open the door and let dishes air dry instead.
Seasonal Energy Saving Strategies
Your energy-saving strategy should change with the seasons, just like your wardrobe.
Summer Efficiency
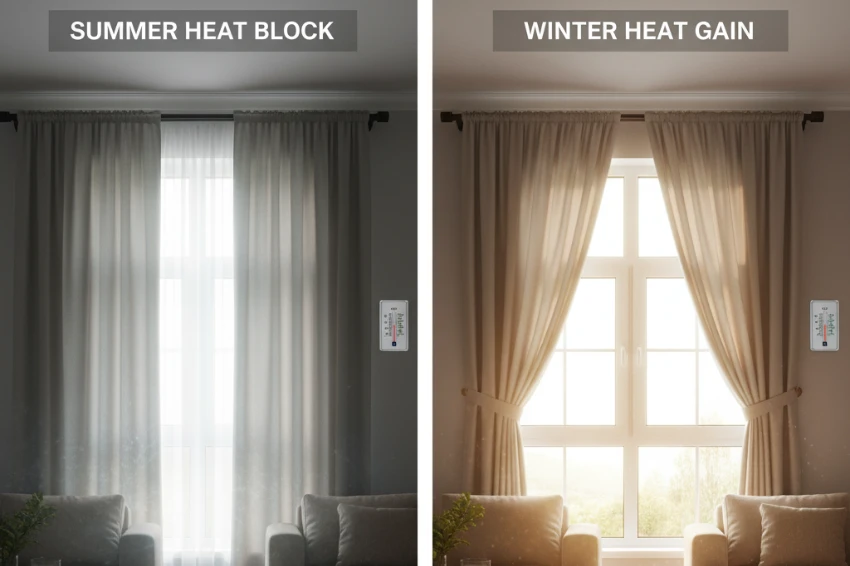
Use curtains and blinds strategically. Close them during peak sun hours on south and west-facing windows to block solar heat gain. You can reduce room temperature by 10-20°F with proper window coverings—essentially free air conditioning.
Consider installing reflective window film on particularly problematic windows. These films block heat while still allowing light through, reducing cooling costs by 5-15%.
Ceiling fans are your summer allies. Remember: fans cool people, not rooms, so turn them off when you leave. The wind-chill effect allows you to set your thermostat 4°F higher without sacrificing comfort.
Winter Efficiency
Do the opposite with window strategies. Open curtains and blinds during sunny days to let solar heat warm your home naturally, then close them at night to insulate against the cold.
Use space heaters strategically in rooms you’re occupying, allowing you to lower the whole-house thermostat. Modern ceramic space heaters are safe and efficient for zone heating, but never leave them unattended.
Reverse ceiling fans (as mentioned earlier) to recirculate warm air that’s risen to the ceiling.
Transition Seasons
Spring and fall offer opportunities to give your HVAC system a break. Open windows for natural ventilation when outside temperatures are comfortable. Your system will appreciate the rest, and you’ll enjoy fresh air and zero energy cost for temperature control.
These are perfect times for maintenance: clean or replace HVAC filters, check weatherstripping, test your thermostat, and prepare for the extreme temperatures ahead.
Creating Your DIY Energy Action Plan
Feeling overwhelmed by options? Let’s create a practical action plan that prioritizes impact and feasibility.
Start with Quick Wins (This Weekend)
- Replace 5-10 most-used light bulbs with LEDs ($30-50, 30 minutes)
- Install door sweeps on exterior doors ($20-40, 1 hour)
- Add outlet gaskets to exterior wall outlets ($10, 30 minutes)
- Change HVAC filters ($5-15, 10 minutes)
- Adjust water heater temperature to 120°F (free, 5 minutes)
These projects require minimal investment and skill but deliver immediate results.
Month One Projects (Next Few Weekends)
- Install programmable or smart thermostat ($100-250, 1-2 hours)
- Apply weatherstripping to all doors and windows ($40-100, 3-4 hours)
- Install window insulation kits on drafty windows ($50-100, 2-3 hours)
- Set up smart power strips in key areas ($60-120, 1 hour)
Bigger Projects (Within 3-6 Months)
- Add or upgrade attic insulation ($300-600, 1-2 days)
- Install ceiling fans if needed ($100-300 each, 2-3 hours per fan)
- Insulate water heater and pipes ($50-100, 2-3 hours)
- Upgrade to Energy Star appliances as needed ($400-2,000+, varies)
Tracking Your Success
Keep your utility bills and track consumption month-over-month. Most utility companies provide online tools showing daily or hourly usage. Watch for drops after implementing each change—it’s incredibly motivating to see real savings.
Take photos of your energy meter reading before starting projects, then monthly thereafter. Calculate percentage improvements. Share your successes with friends and family—everyone loves hearing about ways to save money, and you might inspire them to start their own energy-saving journey.
Conclusion
Transforming your home into an energy-efficient haven doesn’t require a professional contractor, a massive budget, or expertise in home construction. What it requires is the willingness to invest some time, learn a few new skills, and make strategic changes that compound into significant savings.
We’ve covered a lot of ground—from smart thermostat installation and DIY home insulation to draught proofing DIY and phantom power elimination. Each strategy works independently, but together they create a comprehensive approach to home energy efficiency that can realistically reduce your utility bills by 20-40% annually. For many households, that translates to $500-1,000 back in your pocket every year.
Start small if you need to. Every LED bulb you install, every draft you seal, and every degree you optimize on your thermostat contributes to both your financial health and environmental sustainability. The beauty of these DIY energy saving tips is that they’re not all-or-nothing propositions—implement what makes sense for your situation and skill level.
Remember, your home is unique. What works brilliantly in one house might be less impactful in another due to age, construction, climate, or usage patterns. Pay attention to your own results, focus on the changes delivering the biggest returns, and don’t be afraid to experiment.
The journey to an energy-efficient home is ongoing, not a destination. As you complete projects and see results, you’ll naturally become more attuned to energy waste and more motivated to find solutions. You’re not just cutting utility bills—you’re taking control of your home’s performance and contributing to a more sustainable future.
Ready to start saving? Pick one project from this guide, set aside an afternoon this weekend, and get started. Your future self (and your wallet) will thank you. And when you start seeing those lower utility bills roll in, come back and tackle another project. Before you know it, you’ll have transformed your home into an energy-efficient powerhouse, one DIY project at a time.
What energy-saving project will you tackle first? Your journey to lower utility bills starts right now.
Frequently Asked Questions
How long does it take to see savings after implementing DIY energy improvements?
You’ll notice immediate savings from some changes like switching to LEDs or adjusting your thermostat, which show up on your very next utility bill. However, the full impact of comprehensive improvements typically becomes clear over 2-3 billing cycles as you see the cumulative effect across different seasons and usage patterns. Tracking your monthly kilowatt-hour usage rather than just dollar amounts gives a clearer picture since utility rates can fluctuate.
What tools do I need to get started with energy-saving DIY projects?
Most beginner energy-saving projects require surprisingly minimal tools. A basic toolkit including screwdrivers (Phillips and flathead), a caulking gun, a tape measure, scissors or utility knife, and a ladder will cover probably 80% of the projects we’ve discussed. A drill becomes helpful for more advanced projects like installing ceiling fans or mounting thermostats. The beauty is that many projects like changing light bulbs or installing weatherstripping literally require no tools beyond your hands.
Can renters implement these energy-saving strategies?
Absolutely! Renters can tackle numerous projects without permanent modifications. Focus on removable solutions: window insulation kits peel off cleanly, rope caulk removes without residue, smart plugs and power strips are portable, LED bulbs go with you when you move, and portable weatherstripping doesn’t damage door frames. Even something as simple as using heavy curtains for insulation or being strategic about phantom power provides real savings. Always check your lease agreement first, but most landlords appreciate tenants who improve efficiency without causing damage.
How do I prioritize energy projects if I’m on a tight budget?
Start by targeting the intersection of low cost and high impact. Weatherstripping and caulking drafts costs under $50 but can save 10-15% on heating and cooling. Swapping your most-used bulbs to LEDs requires minimal investment but delivers immediate returns. Adjusting your water heater temperature is completely free. Once you’ve harvested these low-hanging fruits, let the monthly savings you’re already seeing fund your next project—essentially making your energy improvements self-financing over time.
Are DIY energy audits as effective as professional ones?
DIY energy audits definitely help identify obvious issues like drafts, inadequate insulation, and inefficient appliances. They’re perfect for getting started and prioritizing projects. However, professional audits use specialized equipment like infrared cameras and blower door tests that reveal hidden problems you might miss—like insulation gaps inside walls or air leakage in unexpected places. Many utility companies offer subsidized professional audits for $50-100, which is well worth it if you’re planning substantial improvements or want a comprehensive baseline assessment.
What’s the actual lifespan of energy-efficient improvements?
LED bulbs typically last 15-25 years, weatherstripping lasts 2-7 years depending on use and quality, attic insulation lasts 80-100 years, smart thermostats last 10+ years, and caulking needs refreshing every 5-10 years. The good news is that most improvements either last long enough to deliver substantial cumulative savings or are inexpensive enough that replacing them remains cost-effective. Quality matters—spending slightly more on better weatherstripping or premium caulk often means better performance and longevity.
How do I know if my old appliances are worth replacing or just maintaining?
Calculate the energy cost difference between your current appliance and a modern Energy Star equivalent. If your appliance is over 15 years old and the annual energy savings would recover 20-30% of the replacement cost, upgrading makes financial sense. For example, if a new refrigerator costs $1,200 but saves $200 annually in electricity, it pays for itself in 6 years and then continues saving for another 10-15 years of its lifespan. Also consider repair costs—if you’re facing a $300+ repair on an old appliance, replacement often makes more sense.
What’s the best way to maintain energy efficiency improvements over time?
Create a simple maintenance calendar on your phone. Set quarterly reminders to check weatherstripping and caulking, monthly reminders for HVAC filter changes, and semi-annual reminders for tasks like cleaning refrigerator coils or checking water heater temperature settings. The key is making energy efficiency a habit rather than a one-time project. Seasonal transitions (spring and fall) are perfect times for comprehensive check-ups where you walk through your home with a critical eye, addressing any degradation before it costs you money.