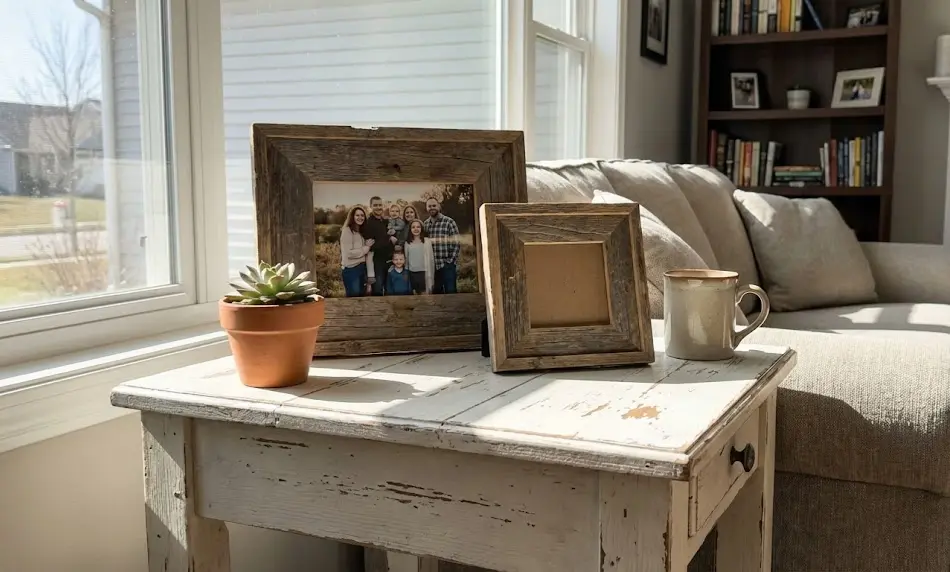
Turn pallet scraps into picture frames and coasters in under 30 minutes. This reclaimed wood frames DIY tutorial shows you how to build mitered accents using 1×4 leftovers, wood glue, and a polyurethane finish. Perfect for budget-conscious homeowners who want rustic charm without the retail markup.
You’ll spend less than $1 per coaster versus $10 at HomeGoods. Plus, you’re keeping wood out of landfills.
What You’ll Need
Before starting, make sure your reclaimed wood is already cleaned, de-nailed, and sanded.
Essential Materials
You need 1×4 reclaimed planks (pallet wood, barn siding, or fence boards work great). Grab Titebond III wood glue from Home Depot because it bonds oily reclaimed surfaces better than standard PVA glue. It stays water-resistant in indoor humidity up to 80% RH, which matters if you live in humid climates.
Pick up four small bar clamps from Ace Hardware (the 6-inch size handles frames up to 8×10″). You’ll also need a miter saw or miter box with hand saw, 120-grit sandpaper, and water-based polyurethane for the finish.
Wood Prep Reminder
Your reclaimed wood must acclimate indoors for one to two weeks before cutting. Woodworkers on r/BeginnerWoodWorking report 1/4-inch warping post-glue when they skip this step due to moisture mismatch.
How to Build Mitered Frames
Step 1: Cut Your Miters
Measure your desired frame size. For a 5×7″ photo frame, cut four pieces with 45-degree angles: two at 5 inches (short sides) and two at 7 inches (long sides). Measure the inside dimension where the photo sits, not the outer edge.
Use a miter saw set to exactly 45 degrees. If you only have a hand saw, clamp a miter box to your workbench for consistent angles. Uneven angles create gaps at corners that glue won’t fix.
For coasters, cut four 4-inch pieces from your 1×4 scrap to create a square frame.
Step 2: Dry Fit First
Arrange all four pieces on your workbench without glue. The mitered corners should meet cleanly with no light showing through. If you see gaps larger than 1/16 inch, re-cut that piece.
This dry fit saves you from discovering alignment issues after the glue sets. Reclaimed wood planks vary in thickness, so one wonky piece ruins the whole frame.
Step 3: Glue and Clamp
Apply a thin bead of Titebond III to each mitered edge. Press the corners together and secure with your four bar clamps (one per corner, angled across the joint). Wipe away squeezed-out glue immediately with a damp rag.
Let the frame cure for 24 hours. Don’t rush this because miter joints rely entirely on glue strength. Fine Woodworking tests show reclaimed wood miter joints gain 30% strength with spline reinforcement (wood biscuits), but that’s overkill for picture frames under 8×10 inches.
Coasters need less clamping pressure since they’re not load-bearing. Just keep the joints tight until the glue sets.
Step 4: Sand and Finish
Sand all edges with 120-grit paper once the glue dries. Focus on the mitered corners to smooth any slight misalignments. Don’t over-sand or you’ll lose the rustic character.
Brush on two coats of water-based polyurethane (or use spray poly for faster coverage). Let each coat dry 2-4 hours. Polyurethane protects the wood from moisture rings if you’re making coasters, and it brings out the grain on picture frames.
Frame Sizing Guide
Standard Photo Frames

Cut 4×6″ frames for desk photos using two 4-inch pieces and two 6-inch pieces. This size uses the least material and works great for Instagram prints.
Make 5×7″ frames for standard photo prints. These fit most drugstore prints and look balanced on gallery walls.
Build 8×10″ frames only if your reclaimed planks are straight and thick (3/4 inch minimum). Larger frames need more clamping pressure and benefit from corner splines for stability.
Coaster Dimensions
Cut four 4-inch pieces to create square coasters that fit standard drinking glasses. Smaller 3-inch squares work for espresso cups or candles.
Don’t go larger than 5 inches for coasters. The frame sits too far from the glass edge and looks awkward on side tables.
Finishing Options
Distressed Look
Skip sanding the face of the wood if you want maximum rustic texture. Only smooth the edges where hands touch. The nail holes, cracks, and weathering tell the reclaimed story.
You can lightly char the edges with a propane torch for a farmhouse vibe. Just pass the flame quickly over the wood (2-3 seconds per spot) before applying polyurethane.
Natural Finish
Sand the entire surface to 220-grit for a smooth, refined look. This works well if your reclaimed wood has interesting grain patterns you want to highlight. Clear poly brings out natural color variations without darkening the wood.
Some makers prefer Danish oil or beeswax paste instead of poly. These penetrating finishes feel softer but offer less moisture protection for coasters.
Common Problems and Fixes
Gaps at Corners
If your mitered corners don’t meet perfectly after gluing, fill small gaps (under 1/8 inch) with wood filler mixed with sawdust from your reclaimed plank. This tinted filler blends better than standard putty.
Larger gaps mean your angles weren’t exactly 45 degrees. Cut new pieces rather than trying to force it.
Warped Frames
Frames that twist after gluing happened because the wood wasn’t fully acclimated. You can’t fix this. Clamp the frame flat to a board while the glue sets next time, or use splines for reinforcement.
Picture Slips Inside Frame
Reclaimed planks have inconsistent thickness, so rabbit groove depth varies from 1/8 to 1/4 inch. Woodworkers on r/DIY complain about photos slipping when the groove is too shallow. Use cardboard shims behind the photo to fill the gap, or route a consistent 1/4-inch rabbit with an adjustable router jig.
For these simple frames, most people skip the rabbit groove entirely and just glue the photo to the back of the frame.
What’s Next
These mitered frames work for photos and coasters only. For larger projects like serving trays with handles, you need butt joints and reinforced corners.
Your leftover scraps under 6 inches long make excellent coasters or mini frames for Instax photos. Nothing goes to waste when you’re working with reclaimed material.
Start with one 5×7″ frame to test your process. Once you nail the miter cuts and clamping pressure, you can batch-produce a dozen frames in an afternoon.