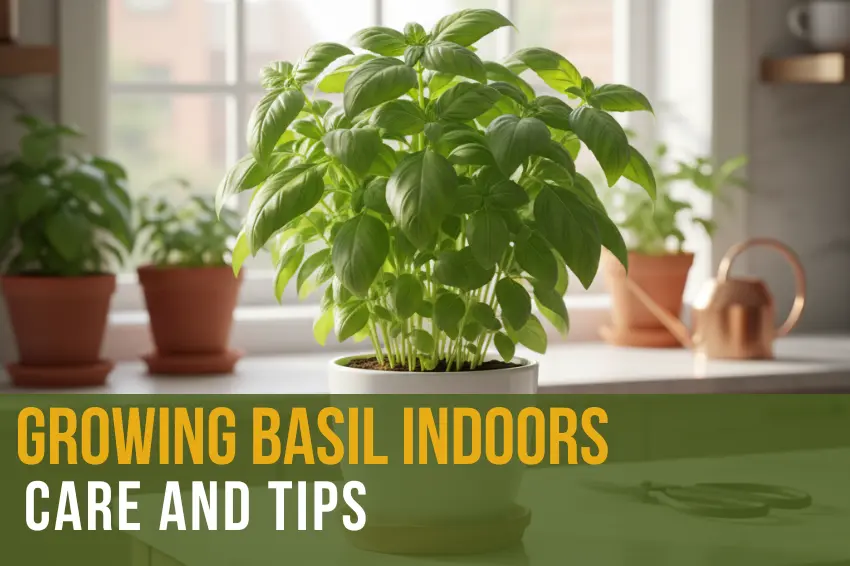
There’s something incredibly satisfying about snipping fresh basil leaves from your own plant while you’re making dinner. No more sad, wilted supermarket bunches that cost five bucks and last maybe three days. We’re talking about vibrant, aromatic leaves that are ready whenever you need them—and trust me, once you start growing basil indoors, you’ll wonder why you didn’t do it sooner.
Growing basil indoors isn’t just about having fresh herbs on hand (though that’s a pretty great perk). It’s about taking control of what you eat, saving money over time, and creating a little green oasis in your home that actually serves a purpose. Plus, if I’m being honest, there’s something deeply satisfying about keeping a plant alive and thriving, especially when it rewards you with delicious leaves.
Whether you’re a total beginner or you’ve killed a basil plant or two in the past (we’ve all been there), this guide will walk you through everything you need to know to grow basil indoors successfully. No fancy equipment required—just some smart choices and a little attention.
Why Grow Basil Indoors?
Before we dive into the how-to, let’s talk about why indoor basil is such a game-changer. First, you’re not at the mercy of seasons or weather. Winter in Minnesota? No problem. Tiny apartment with no yard? Perfect. You control the environment, which means you control the results.
Second, the cost savings are real. A typical grocery store basil bunch costs around $3-5 and gives you maybe a handful of leaves. One healthy basil plant can produce fresh leaves for months, and the initial investment is minimal. We’re talking smart spending here—the kind that pays you back in pesto and caprese salads.
And let’s not forget the eco-angle. Growing your own herbs means less packaging waste, no transportation emissions, and you know exactly what (if anything) has been sprayed on your food. It’s one of those small changes that feels good and tastes even better.
Getting Started: What You Need
Choosing the Right Basil Variety
Not all basil is created equal when it comes to indoor growing.
Genovese Basil:
- The go-to recommendation to start with.
- It’s the classic Italian variety.
- It is forgiving and produces big, flavorful leaves.
Greek Basil:
- A more adventurous option.
- Stays compact, making it perfect for small spaces.
Thai Basil:
- Adds a spicy, licorice-like kick to Asian dishes.
You can absolutely grow different varieties of basil indoors at the same time. Just keep them in separate pots and make sure each one gets adequate light and space. I like having two or three varieties going—it’s like having a mini herb shop right in my kitchen.
The Best Soil for Basil Indoors
Here’s where people often go wrong: they grab any old potting soil and wonder why their basil struggles. Basil needs well-draining soil that’s rich in nutrients but not too heavy. I use a mix that’s roughly:
- 60% high-quality potting soil
- 30% perlite or vermiculite (for drainage)
- 10% compost (for nutrients)
If mixing your own sounds like too much work, look for an organic potting mix specifically labeled for herbs. Product Recommendations:
- Espoma Organic Seed Starter Mix: Fantastic for starting basil seeds indoors.
- Espoma Organic Herb-Tone Fertilizer: Gives established plants the nutrients they crave.
The key here is drainage. Basil hates soggy roots, so that perlite or vermiculite is non-negotiable. Trust me on this—I’ve learned the hard way.
Container Selection
Your container matters more than you might think.
- For a single basil plant: I recommend a pot that’s at least 6-8 inches in diameter and has drainage holes (this is crucial).
- For multiple plants: Give each one its own space or choose a larger container with at least 6-8 inches between plants.
Self-watering planters like the Bloem Aqua Rite or Lechuza Self-Watering Planter Pots are brilliant for beginners because they take the guesswork out of watering. The reservoir system keeps the soil consistently moist without overdoing it. If you’re forgetful about watering (no judgment—we all get busy), these can be lifesavers.
For a more budget-friendly option, reuse those plastic containers from takeout or yogurt. Just drill or poke drainage holes in the bottom, and you’re good to go.
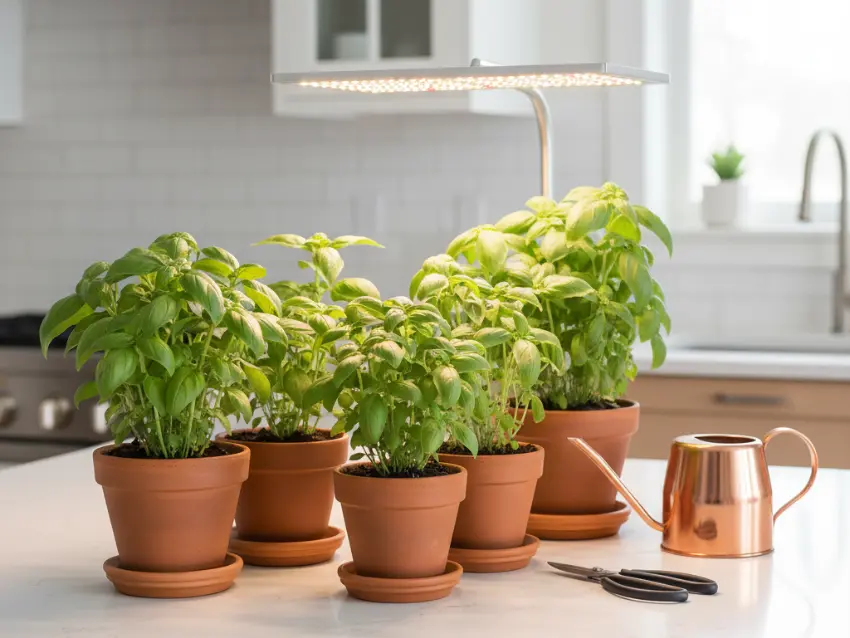
Light: The Make-or-Break Factor
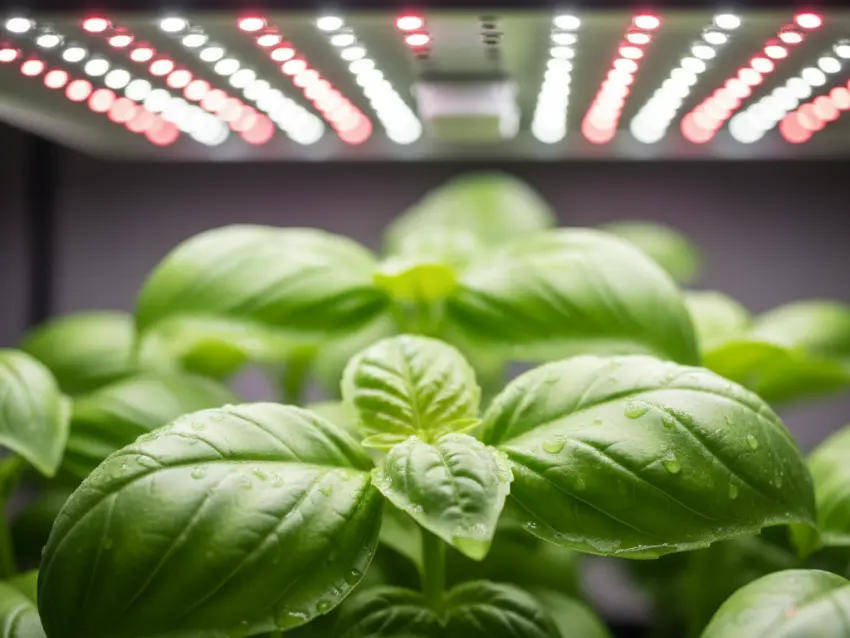
Let’s be real: lighting is where most indoor basil attempts succeed or fail. Basil is a sun-loving plant that needs 6-8 hours of bright light daily to truly thrive. If you have a south-facing window that gets direct sunlight most of the day, you might be able to skip artificial lights. But for the rest of us? Grow lights are the secret weapon.
Can Basil Grow Without Natural Sunlight?
Absolutely! Basil can grow perfectly well under artificial light—in fact, it can sometimes do even better because you control the intensity and duration. I’ve grown gorgeous basil in a basement with zero natural light using just a simple LED grow light.
The trick is choosing the right type of light. Full-spectrum LED grow lights like the GE LED Grow Light for Indoor Plants or iPower 300W Full Spectrum LED Grow Light mimic natural sunlight and are energy-efficient. Position the light 6-12 inches above your plants and keep it on for 12-16 hours daily.
Pro tip: Rotate your pots every few days so all sides of the plant get equal light exposure. Otherwise, you’ll end up with a lopsided basil plant that’s reaching desperately toward the light source.
Temperature and Humidity: Creating the Perfect Climate
Basil is basically a warm-weather diva. The ideal temperature range for indoor basil is 65-75°F (18-24°C) during the day, and it can tolerate nighttime temps down to about 50°F (10°C)—but it won’t be happy about it.
Keep your basil away from cold drafts, air conditioning vents, and heaters. Sudden temperature swings stress the plant and can lead to leaf drop or slow growth. I learned this lesson when I placed a plant too close to an AC vent in summer—the poor thing looked miserable within days.
Humidity Needs
Basil appreciates moderate humidity (around 40-60%), which is usually fine in most homes. If your air is really dry (looking at you, winter heating season), you can mist your plants occasionally or place the pots on a tray filled with pebbles and water. The water evaporates and creates a little humidity microclimate around your plants. Simple, but effective.
Watering: Finding the Sweet Spot
Here’s the golden rule for watering basil indoors: keep the soil consistently moist but never waterlogged. I know that sounds vague, but you’ll get a feel for it quickly.
How often should you water? It depends on your conditions—temperature, humidity, pot size, and soil type all play a role. Generally, I water my indoor basil every 2-3 days in summer and every 4-5 days in winter. The best way to check is to stick your finger about an inch into the soil. If it feels dry, water. If it’s still moist, wait.
When you do water, water thoroughly until you see it draining out the bottom. Then—and this is important—dump out any excess water from the saucer. Basil sitting in water is a recipe for root rot and fungal problems.
Starting Basil from Seed vs. Buying Plants
You have two main options: start from seed or buy an established plant. Both work great, so choose based on your patience level and budget.
Growing Basil Indoors from Seed
Starting from seed is incredibly satisfying and super affordable. One packet of seeds costs a few dollars and can give you dozens of plants. Here’s my simple method:
- Fill small containers or seed trays with seed-starting mix
- Plant seeds about ¼ inch deep, 2-3 per container
- Keep the soil moist and warm (70-75°F is ideal—a Hydrofarm Jump Start Seedling Heat Mat helps)
- Seeds should germinate in 5-10 days
- Once seedlings have 2-3 sets of true leaves, thin to the strongest one per pot or transplant
The Burpee Complete Kitchen Garden Kit or JRB Naturally Organic Basil Seed Kit are excellent for beginners because they include everything you need and take the guesswork out.
Buying Established Plants
If you want instant gratification (no shame in that), buying a small basil plant from a nursery or grocery store works perfectly. Just make sure to repot it into a larger container with fresh soil once you get it home—those little store pots are usually too small for long-term growth.
Fertilizing Your Indoor Basil
Basil is a hungry plant, especially when you’re harvesting regularly. I feed mine every 2-3 weeks during the growing season with a diluted liquid fertilizer. The Espoma Organic Indoor Plant Food is my go-to because it’s gentle and organic.
Mix the fertilizer at half the strength recommended on the bottle—basil doesn’t need heavy feeding, and too much fertilizer can actually reduce the flavor of the leaves. A little goes a long way.
Preventing Common Problems
Fungal Diseases and Pests
The most common issue with indoor basil is fungal problems, usually caused by overwatering or poor air circulation. To prevent this:
- Don’t water the leaves—water the soil
- Ensure good air circulation with a small fan (the Hydrofarm Active Air Oscillating Fan 6 Inch is perfect)
- Don’t crowd plants together
- Remove any yellowing or damaged leaves immediately
As for pests, aphids and spider mites occasionally show up. If you spot them, spray the plant with a mixture of water and a few drops of dish soap, or use insecticidal soap. Catching them early is key.
Leggy Growth
If your basil is getting tall and spindly with lots of space between leaf sets, it’s not getting enough light. Move it closer to your light source or upgrade your grow light.
Harvesting and Pruning Basil Indoors
This is where the magic happens. The more you harvest basil correctly, the bushier and more productive your plant becomes. Here’s how to do it right:
When to harvest: Once your plant has at least 6-8 leaves and is about 6 inches tall, you’re good to start harvesting.
How to harvest: Use clean scissors or pruning shears (the Fiskars Easy Action Pruning Shears are excellent) and cut just above a leaf node where two leaves meet the stem. This encourages the plant to branch out at that spot, giving you two new stems instead of one.
Never take more than one-third of the plant at a time—you want to keep it healthy and growing. And here’s a crucial tip: always pinch off flower buds as soon as you see them. Once basil flowers, the leaves become bitter and the plant puts all its energy into seed production instead of leaf growth.
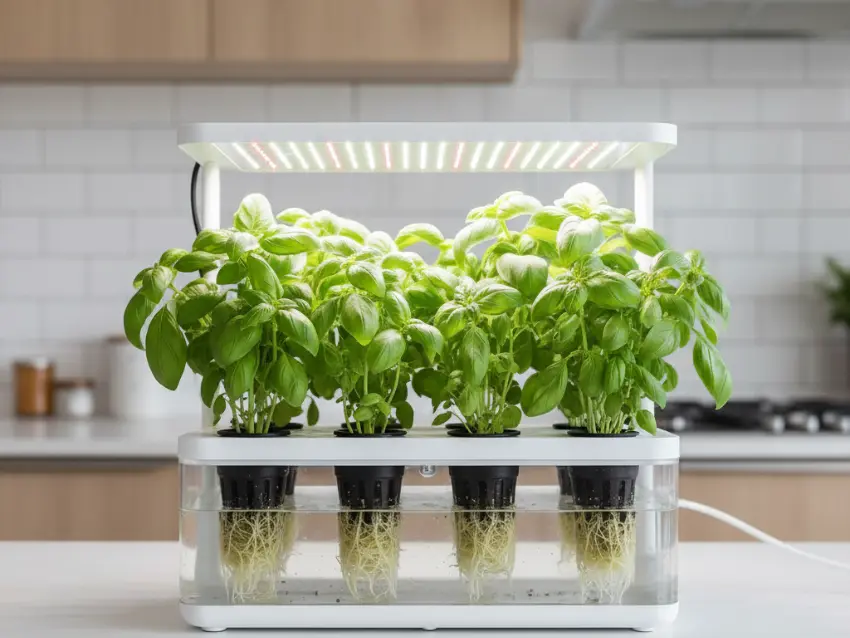
Advanced Options: Hydroponic Systems
If you really want to level up your indoor basil game, hydroponic systems are worth considering. They’re surprisingly beginner-friendly and can produce faster growth and bigger yields than soil.
The AeroGarden Bounty Elite or Click & Grow Smart Garden 3 are plug-and-play systems that handle light, water, and nutrients automatically. Yes, they’re pricier upfront, but they’re practically foolproof. The Back to the Roots Hydroponic Herb Garden is a more budget-friendly option that still delivers great results.
Hydroponic basil tends to grow faster and have a cleaner setup (no soil mess), but it requires monitoring water levels and occasionally adding nutrients. If you’re into gadgets and want a low-maintenance system, it’s definitely worth exploring.
Quick Reference: Indoor Basil Care Table
| Care Factor | Requirement | Tips |
|---|---|---|
| Light | 6-8 hours daily (natural or artificial) | Use full-spectrum LED grow lights if natural light is limited |
| Temperature | 65-75°F (18-24°C) | Avoid cold drafts and sudden temperature changes |
| Watering | Keep soil moist, not waterlogged | Check soil moisture before watering; water when top inch is dry |
| Soil | Well-draining, nutrient-rich mix | Add perlite for drainage; use herb-specific potting mix |
| Fertilizer | Every 2-3 weeks | Use organic liquid fertilizer at half strength |
| Humidity | 40-60% | Mist occasionally or use pebble tray in dry conditions |
| Container Size | 6-8 inches diameter minimum | Must have drainage holes |
| Harvest Method | Cut above leaf nodes | Remove flower buds; never take more than 1/3 of plant |
Your Indoor Basil Journey
Growing basil indoors is one of those things that seems intimidating until you actually try it—and then you realize it’s totally doable. You don’t need a green thumb or expensive equipment. Just decent light, the right soil, consistent watering, and a little attention.
Start small if you’re nervous. One plant in a sunny window can teach you everything you need to know. Once you taste that first homegrown leaf in your pasta or salad, you’ll be hooked. And the best part? Every time you harvest, your plant gets bushier and more productive. It’s the gift that keeps on giving.
So grab a pot, some soil, and a packet of seeds (or a starter plant from the store). Your kitchen is about to get a whole lot fresher, and your grocery bill is about to get a little lighter. Ready to give it a shot? Your future self—the one making fresh pesto at midnight because you can—will thank you.
Now that you’re ready to master basil, why stop there? This guide is the perfect first step, but when you’re ready to build a full indoor herb garden with mint, parsley, and more, be sure to check out our complete guide: 15 Tips for Growing Herbs Indoors All Year Round.
Have you tried growing basil indoors? What varieties are you growing, and what’s your favorite way to use fresh basil? Drop a comment below—I’d love to hear about your herb garden adventures!
Frequently Asked Questions
Can I grow basil indoors in winter without a grow light?
It’s challenging but possible if you have a very bright south-facing window that receives at least 6 hours of direct sunlight daily. However, winter sunlight is often weaker and shorter, so most indoor basil plants struggle without supplemental lighting. A simple LED grow light makes winter growing much more reliable and produces healthier, more productive plants.
How do I know if I’m overwatering my indoor basil?
Watch for these telltale signs: yellowing lower leaves, wilting even when soil is wet, a musty smell from the soil, or soft, mushy stems near the base. Overwatered basil often develops root rot, which is hard to reverse. If you catch it early, let the soil dry out completely before watering again and ensure your pot has adequate drainage.
Why does my indoor basil taste different from store-bought?
Homegrown basil often tastes more intense and aromatic than store-bought because you’re harvesting it fresh at peak flavor. Store-bought basil is typically harvested days before you buy it and loses essential oils during transport and storage. Your growing conditions—especially light intensity and fertilizer type—also affect flavor. Organic fertilizers tend to produce better-tasting herbs than synthetic ones.
Can I propagate basil from cuttings instead of seeds?
Absolutely! Basil roots easily from cuttings. Snip a 4-inch stem just below a leaf node, remove the lower leaves, and place it in a glass of water on a sunny windowsill. Change the water every few days. You should see roots developing within 1-2 weeks. Once roots are about 2 inches long, transplant into soil. This method is faster than growing from seed and guarantees you get the exact same variety.
How long will an indoor basil plant live?
With proper care and regular harvesting, an indoor basil plant can produce for 4-6 months or even longer. Eventually, the plant will become woody and less productive. However, you can easily start new plants from cuttings or seeds every few months to ensure you always have young, vigorous plants producing. Some people keep a rotation going—starting new plants every 6-8 weeks for continuous harvest.