The Problem. You’re staring at blank walls and scrolling through Etsy, wondering if you should drop $50 on a print or grab some canvas and paints for $15. The internet promises DIY saves money, but you’re skeptical—and you should be.
The Promise. This guide cuts through the crafting myths with actual numbers, hidden costs, and lifecycle analysis. You’ll learn exactly when DIY wall art genuinely saves money versus when buying prints is the smarter financial move, backed by material costs, durability data, and per-year-on-the-wall calculations that most bloggers ignore.
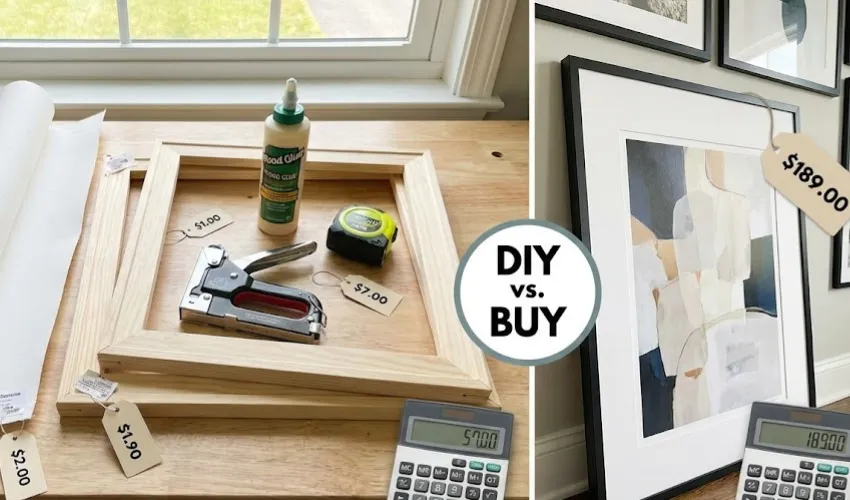
When DIY Wall Art Actually Saves Money (And When It Doesn’t)
The one-piece trap. Creating a single DIY canvas piece costs roughly $5–15 in basic materials—canvas, craft paints, brushes. Sounds cheap until you factor in the $8 cutting mat you’ll use once, the $12 sealer you’ll barely touch, and the two failed attempts that consumed another $10 in wasted supplies. Your “budget” project quietly climbs to $30–45.
The bulk advantage. DIY becomes genuinely economical when you’re creating multiple pieces. Once you own the tools and buy paints in larger quantities, your per-piece cost drops dramatically:
- First piece: $35–50 (including tools, failed experiments)
- Fifth piece: $8–12 (materials only, tools amortized)
- Tenth piece: $5–8 (bulk materials, refined technique)
The print alternative. Digital art downloads cost $2–5, professional printing runs $6–10 for an 11×14″ print, and basic frames add another $5–15. Total investment: $13–30 per finished piece with zero learning curve and predictable results.
Making your own stretched canvas. Building canvas from scratch costs approximately $10–15 (£10–15) for medium-sized pieces versus $15–30 (£15–30) for store-bought alternatives, but only if you value your labor at zero and already own staple guns and cutting tools.
The Hidden Costs That Destroy DIY Budgets
Failed experiments eat profits. Beginners rarely nail their first attempt. That abstract piece that looked easy on Pinterest? It consumed three canvases, four paint colors you’ll never use again, and an entire Saturday afternoon.
Tool creep is real. You start with basic brushes, then realize you need:
- Palette knives for texture ($6–12)
- Proper sealer for UV protection ($8–15)
- Quality brushes after the cheap ones shed bristles ($10–25)
- Cutting mat and ruler for clean edges ($15–20)
- Painter’s tape for crisp lines ($4–6)
Leftover supplies accumulate. That half-empty tube of burnt umber, three barely-used brushes, and quarter-can of varnish represent sunk costs that never appear in those cheerful “I made this for $10!” posts.
Time has value. A simple geometric canvas takes 2–4 hours for beginners (design, painting, drying, sealing). More complex pieces require 6–12 hours. If your weekend time has any value, professional prints suddenly look more appealing.
Key Takeaways: Cost Comparison Table
| Factor | DIY Wall Art | Buying Prints |
|---|---|---|
| First piece cost | $35–50 (including basic tools) | $13–30 (digital file + printing + frame) |
| Per-piece after 5+ works | $8–15 (materials only) | $13–30 (consistent per piece) |
| Time investment | 2–12 hours depending on complexity | 15–30 minutes (selection + ordering) |
| Fade resistance | Variable; cheap craft paints fade in 2–3 years without UV protection | Professional UV-resistant prints last 8–10+ years |
| Skill requirement | Moderate to high; steep learning curve | Minimal; anyone can order and frame |
| Customization | Unlimited; perfect color matching for your space | Limited to available designs and color variations |
| Breakeven point | 4–6 pieces (when tool costs amortize) | N/A; consistent cost per piece |
| Best for | Gallery walls, ongoing projects, color-matching | Single statement pieces, high-fidelity art |
Budget Reality: The Cost-Per-Year Calculation Nobody Mentions
The lifecycle approach. A $20 professional print with UV-resistant inks and quality paper lasts 8–10 years in a bright room. Annual cost: $2–2.50 per year on your wall.
The DIY reality check. A $15 DIY canvas using budget craft paints and unsealed paper fades or warps in 2–3 years under identical conditions. Actual annual cost: $5–7.50 per year—nearly triple the “expensive” print.
Quality materials change the math. Using artist-grade acrylics, proper canvas, and UV-protective varnish pushes your DIY piece to $25–40 but extends life to 5–8 years. Now you’re competitive with professional prints, but only if you’re making multiple pieces to justify the tool investment.
The breakeven formula. DIY becomes cheaper when: (Total tool cost ÷ Number of pieces) + Material cost per piece < Cost of equivalent print. For most households, that breakeven hits around piece #4–6.
Eco-Impact: Which Option Is Actually Greener?
DIY environmental advantages. You control every input—low-VOC paints, recycled canvas, reclaimed wood frames. Water-based acrylics emit VOCs around tens of g/L during application but drop to near-zero after 1–2 days of curing with proper ventilation.
DIY environmental risks. Abandoned projects create waste. That partially-used canvas, three failed attempts, and leftover paints you’ll never finish represent embodied carbon and landfill contributions. Single-use craft supplies undermine eco-benefits.
Print production footprint. Commercial printing consumes paper, inks, and shipping energy. Conventional poster production generates significant CO₂, and approximately 45% of printed promotional materials are discarded quickly. However, recycled papers and eco-friendly inks substantially reduce impact.
The winner depends on completion rate. DIY wins environmentally if you complete projects and use materials fully. Prints win if you’re likely to abandon DIY attempts or purchase supplies you won’t use again.
VOC safety specifics. Metallic and pearlescent craft acrylics can reach 300 g/L VOC levels during application. Traditional oil painting solvents like turpentine spike to 1,200 g/L, requiring serious ventilation. Modern water-based craft paints and zero-VOC formulas make indoor DIY safer than ever—just open windows during application and drying.
Durability Face-Off: What Lasts Longer?
Professional print advantages. Calibrated printers use pigment-based inks designed for fade resistance. UV-resistant art prints outperform budget DIY materials in direct sunlight, maintaining color integrity for 8–10+ years.
DIY durability depends on materials. Quality stretched canvas with artist-grade acrylics and proper UV-protective sealant matches professional prints. Cheap craft paints on unsealed paper fade and yellow within 2–3 years, especially near windows.
The moisture factor. Budget DIY pieces using paper substrates warp in humid bathrooms or kitchens. Canvas and properly-sealed wood panels handle environmental changes better, but only if you invest in quality sealers ($8–15 per bottle).
The cheap print trap. Mass-market posters on thin paper with low-quality inks curl and fade faster than sealed DIY pieces. That $5 clearance print isn’t saving money if you’re replacing it every 18 months.
The Verdict: When to DIY vs. When to Buy
Buy prints when:
- You need 1–2 statement pieces. A $20–100 professional print delivers instant polish without tool investment or learning curve.
- High-fidelity matters. Photography, detailed illustrations, and fine art reproductions leverage professional printing equipment that’s impossible to match at home without spending thousands.
- Time is scarce. Ordering takes 15 minutes; DIY takes 4–12 hours per piece.
- You’re non-crafty. No shame in this—professional results guaranteed, no skill required.
Choose DIY when:
- You’re creating 4+ pieces. Tool costs amortize, making per-piece cost drop below prints.
- Customization is critical. Gallery walls requiring specific sizes, colors, or shapes to match your exact room palette.
- You enjoy the process. If crafting is recreation, not just decoration, the time investment becomes a feature, not a bug.
- You’re building a maker habit. Regular projects mean your tools and bulk materials get continuous use, maximizing cost efficiency.
Ready to Start Creating? Since DIY pays off when you make multiple pieces, you’ll need plenty of inspiration. Check out our list of the best budget-friendly wall art ideas for living rooms to fill your gallery wall without emptying your wallet.
The hybrid approach. Most budget-conscious homes benefit from mixed strategy: buy 1–2 hero pieces (large, detailed, high-impact) and DIY the supporting gallery wall pieces (abstract, geometric, color-matching accents) once you’ve committed to multiple projects.
Conclusion
DIY wall art is cheaper than buying prints only after you clear the 4–6 piece threshold and already own basic tools. For single pieces or occasional decorating, professional prints deliver better cost-per-year value, superior fade resistance, and zero time investment.
The honest math. Your first DIY canvas costs $35–50 when you factor in tools and failures. Professional prints run $13–30 with predictable quality. But by piece #5, your DIY cost drops to $8–12 while prints remain constant—that’s where savings emerge.
The lifecycle reality. A $20 UV-resistant print lasting 10 years costs $2 annually. A $15 DIY piece fading in 3 years costs $5 annually. Quality matters more than sticker price.
Still considering your wall art strategy? Check our Budget DIY Hacks section for detailed tutorials on maximizing material value, or explore Eco-Friendly Craft Supplies to find low-VOC paints and recycled canvases that make DIY both economical and sustainable.