It is mid-November, which means your kids will soon be looking for something to build, paint, and create. There is also a very good chance a giant bag of wooden craft sticks is already hiding in the back of your junk drawer. You do not need an expensive trip to the craft store to make memories this holiday season.
Popsicle stick Christmas ornaments remain one of the absolute best deals in holiday crafting. A standard bag of sticks costs under $5, and the resulting creations will easily hold up for decades if you build them correctly. Picture a lopsided, glitter-covered reindeer your kid made at age five. In twenty years, that sweet little handmade craft will beat any store-bought glass bauble on your tree.
Essential Supplies for Your Craft Station
You can build almost every ornament on this list using the exact same basic kit. Stock up once, cover your kitchen table with newspaper, and you are completely set for the season. Standard size sticks are perfect for most projects, though mini sticks are a great addition for tiny tabletop trees.
Acrylic craft paint works much better on raw wood than washable watercolors. You will also need a reliable pair of scissors, along with twine, ribbon, or yarn to create your hanging loops. For the fun part, dig out pom-poms, googly eyes, buttons, sequins, pipe cleaners, beads, and a healthy amount of glitter.
Choosing the Right Glue for Wooden Sticks
This is where many crafting sessions go sideways. You have three main options, and each serves a very different purpose. Knowing which one to grab will save you from a pile of collapsed sticks on your living room floor.
Wood glue gives you the strongest, most permanent stick-to-stick bond. The catch is that it requires patience, as it needs to cure overnight in a room that stays around 70 degrees Fahrenheit. If you have the time, this is the best choice for building the structural frame of your ornaments.
Hot glue is the speed demon of the craft world. It sets in seconds, making it perfect for rapid assembly, but it is strictly an adult-run tool. Before plugging in your glue gun, take a few minutes to review basic Christmas decoration safety tips to keep little hands completely safe during family craft night.
School glue is your go-to for decorating and attaching lightweight items like sequins or paper shapes. It is safe for kids to use independently, but it will let your wooden frame slip if you use it for the main structure. Let school glue dry completely flat for at least 12 hours before hanging.
The Beginner-Friendly Group
These are the foolproof, classic ornaments you can finish in one sitting, even with a toddler aggressively helping you. They work beautifully for kindergarten classrooms and chaotic family craft nights. The shapes are simple, and the decorating options are endless.
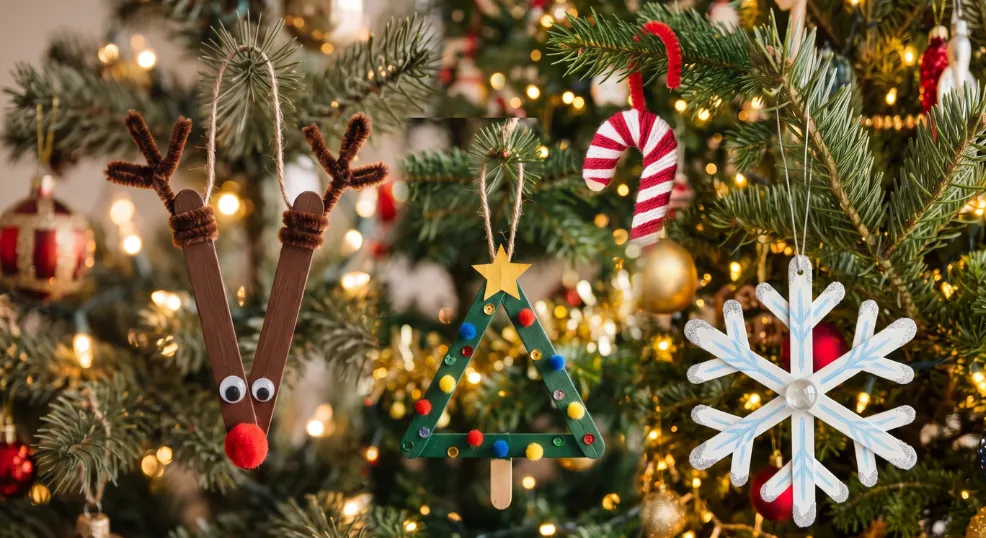
1. Classic Popsicle Stick Snowflake Ornament
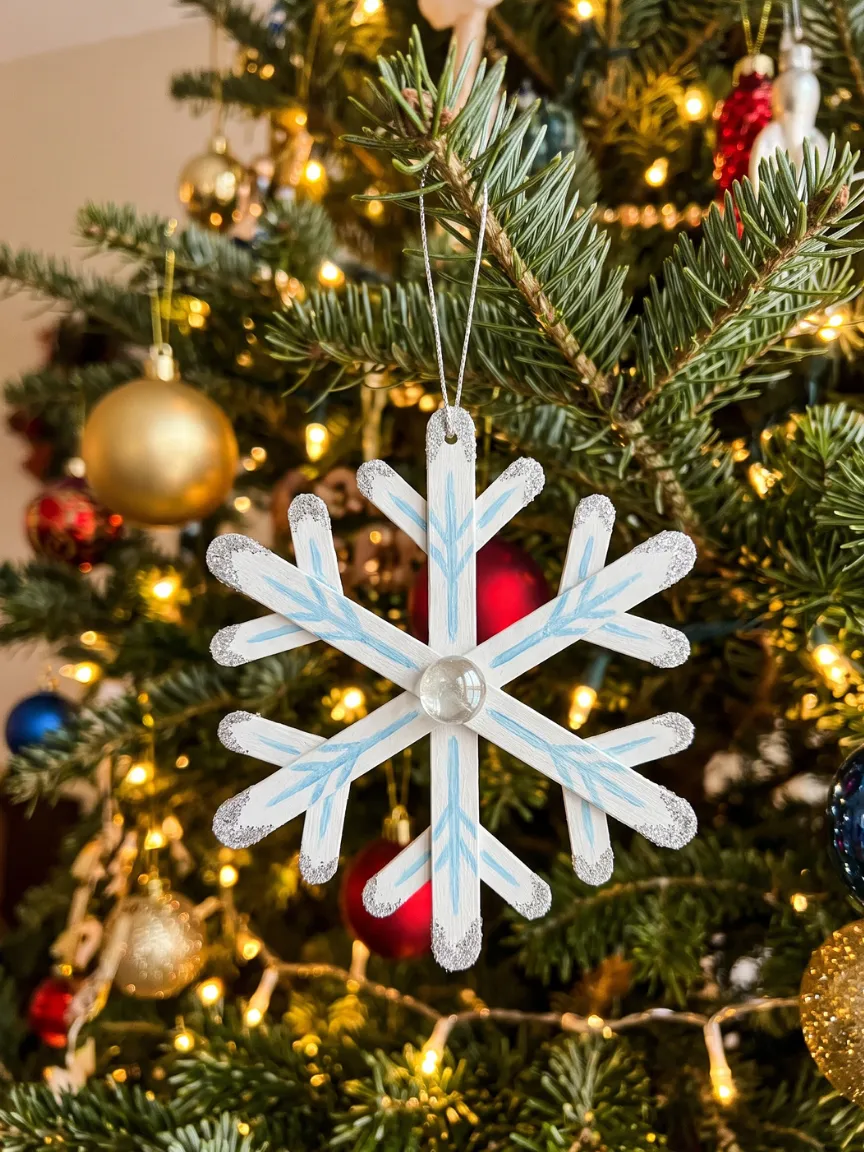
The snowflake is the ultimate gateway craft. Lay three sticks across each other like spokes on a wheel and secure them at the center. Let the frame dry completely before moving on to the messy part.
Paint the sticks crisp white, or let the kids go wild with icy blue and silver. Add a button or a small glass bead in the exact center to hide the overlapping joints. Dab the edges with glitter glue, and you have a snowflake that looks like it came from a boutique.
2. Popsicle Stick Christmas Tree Ornament
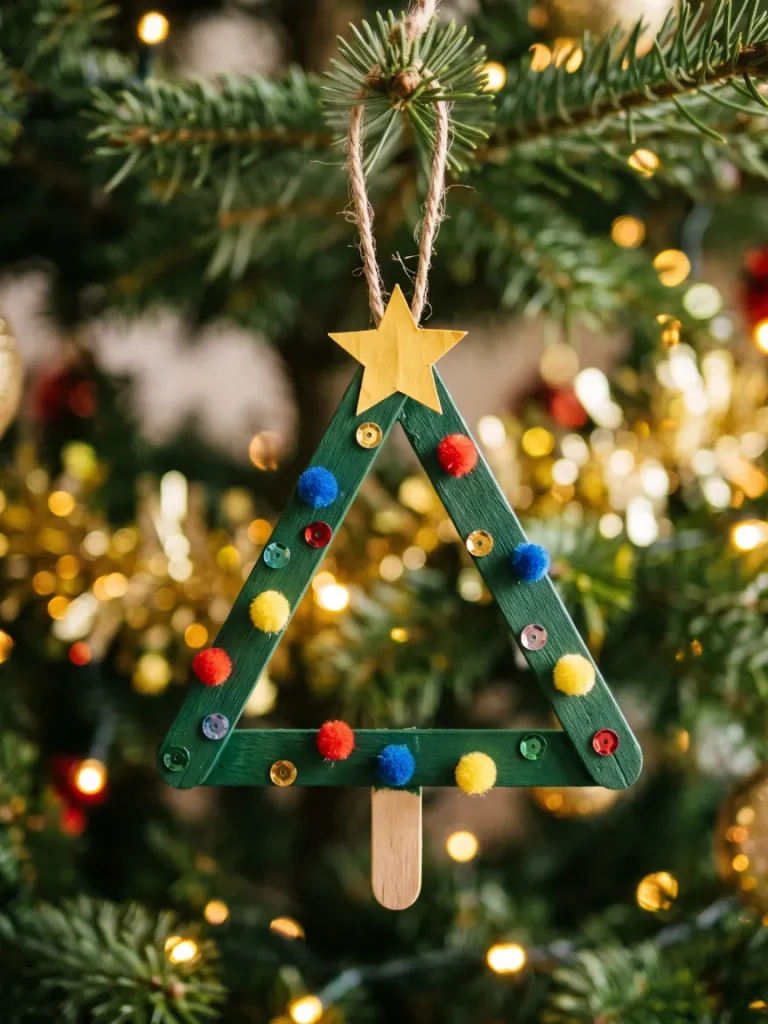
Glue three sticks into a simple triangle to form the body of the tree. Attach a short, one-inch piece of a stick at the bottom center to act as the trunk. Once the glue sets, paint the entire triangle a deep pine green.
Decorating this one is incredibly fun. Glue on colorful beads, miniature pom-poms, or shiny sequins to look like string lights. Top the peak with a small yellow paper star, and attach a twine hanging loop to the back.
3. Craft Stick Star Ornament
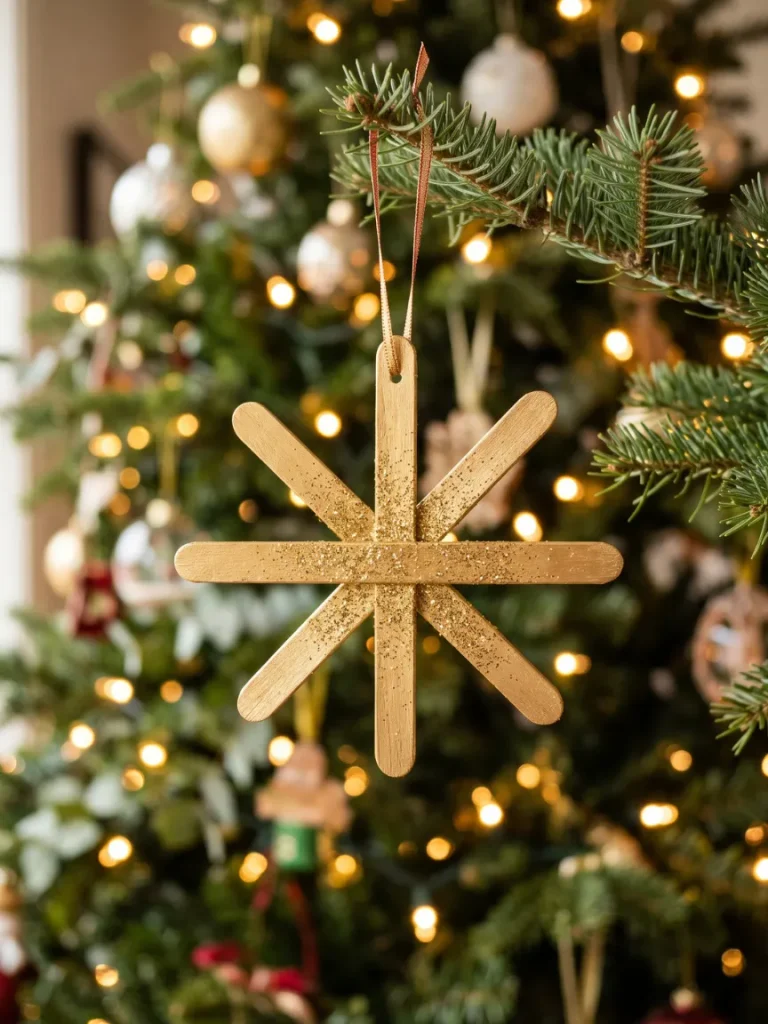
Glue two sticks together in an X shape, and then build a second identical X. Layer the two crosses on top of each other, rotating one slightly to create an eight-point star. Paint the entire structure metallic gold or silver.
A swipe of clear glue and a dusting of loose glitter will make this star catch the light beautifully. If you ever need a last-minute, handmade gift tag topper, this is the quickest option to whip up.
4. Candy Cane Ornament
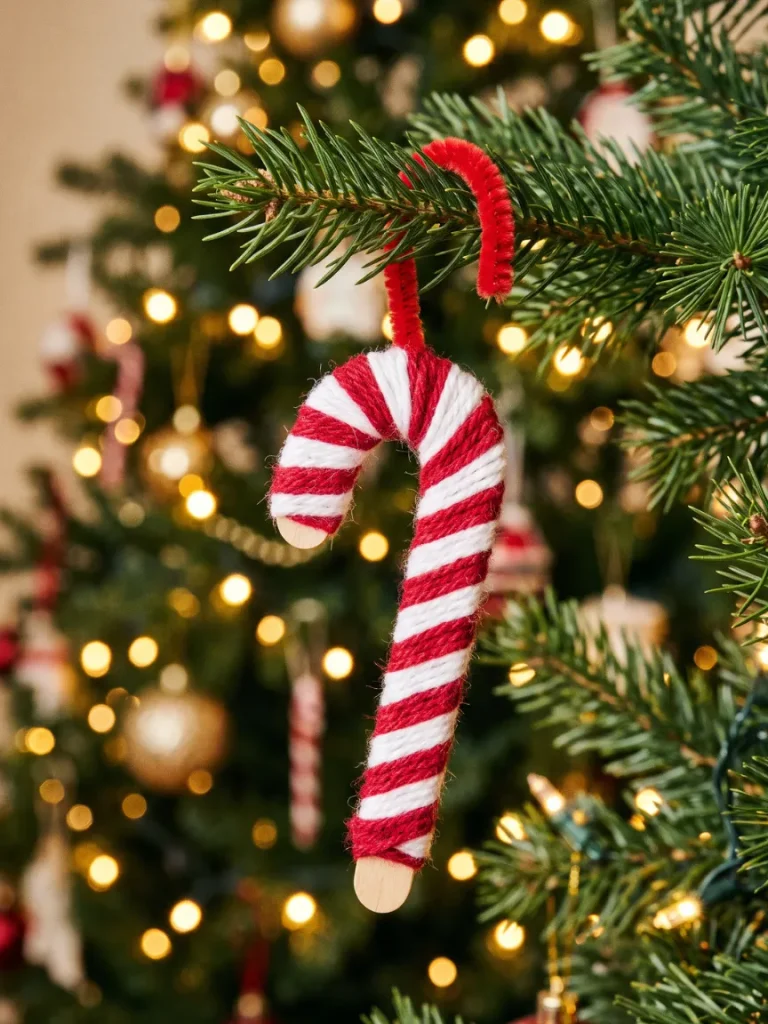
Take a single craft stick and paint it with diagonal red and white stripes. If you want a more textured look, tightly wrap alternating red and white yarn down the length of the wood. Secure the ends of the yarn with a tiny drop of hot glue on the back.
Take a red pipe cleaner and bend the top inch into a hook shape. Glue this pipe cleaner directly to the back of your decorated stick. You instantly have a sweet candy cane without the impending sugar crash.
5. Mini Sled Ornament
Lay two sticks perfectly side by side and glue them together to form the seat of the sled. Flip it over and attach two pipe cleaners or thick pieces of bent twine underneath to act as the curved runners. Paint the wooden seat a bright, festive red.
To finish the look, glue a tiny square bead or a small wrapped cube to the top of the sled to look like a freshly delivered present. It is a highly charming, three-dimensional ornament that comes together in minutes.
The Character Crew
Kids absolutely love bringing these little wooden faces to life. These designs take a bit more paint and detail, but they end up being the ornaments everyone fights over. Keep some damp paper towels nearby to wipe messy fingers.
6. Popsicle Stick Reindeer Ornament
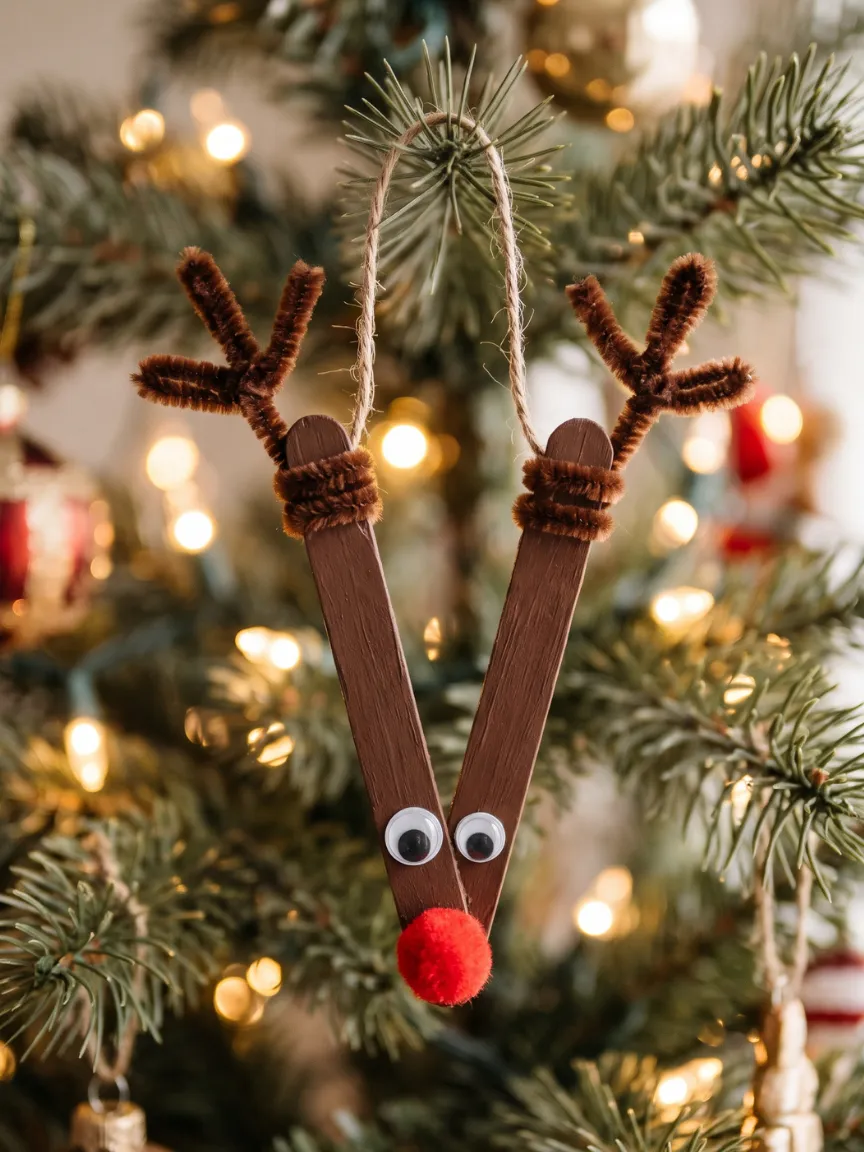
This is a massive crowd-pleaser and incredibly simple to build. Glue two sticks together at the bottom to form a sharp V shape. Once dry, paint the entire frame brown and let it cure.
The magic happens in the details. Add two googly eyes, a fuzzy red pom-pom for the nose, and twist brown pipe cleaners around the top for antlers. A slightly cross-eyed reindeer always ends up having way more personality than a perfectly symmetrical one.
7. Popsicle Stick Santa Ornament
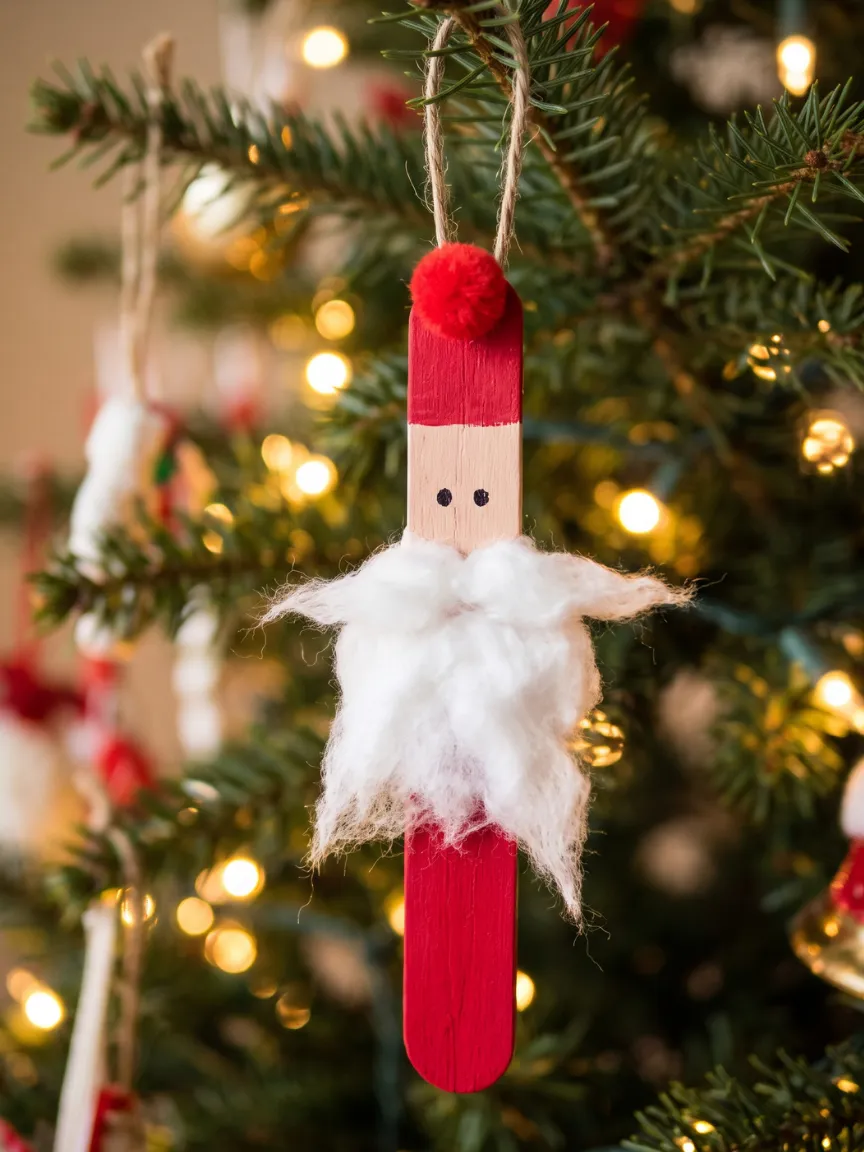
Take a single wide craft stick and paint the top third a light skin tone. Paint the bottom two-thirds bright crimson red. Glue a stretched-out cotton ball across the middle to create a fluffy white beard.
Attach a tiny red pom-pom to the very top edge to look like a hat tassel. Draw on two little black dots for eyes just above the cotton beard. It is simple, jolly, and very forgiving if your paint lines are not perfectly straight.
8. Popsicle Stick Angel Ornament
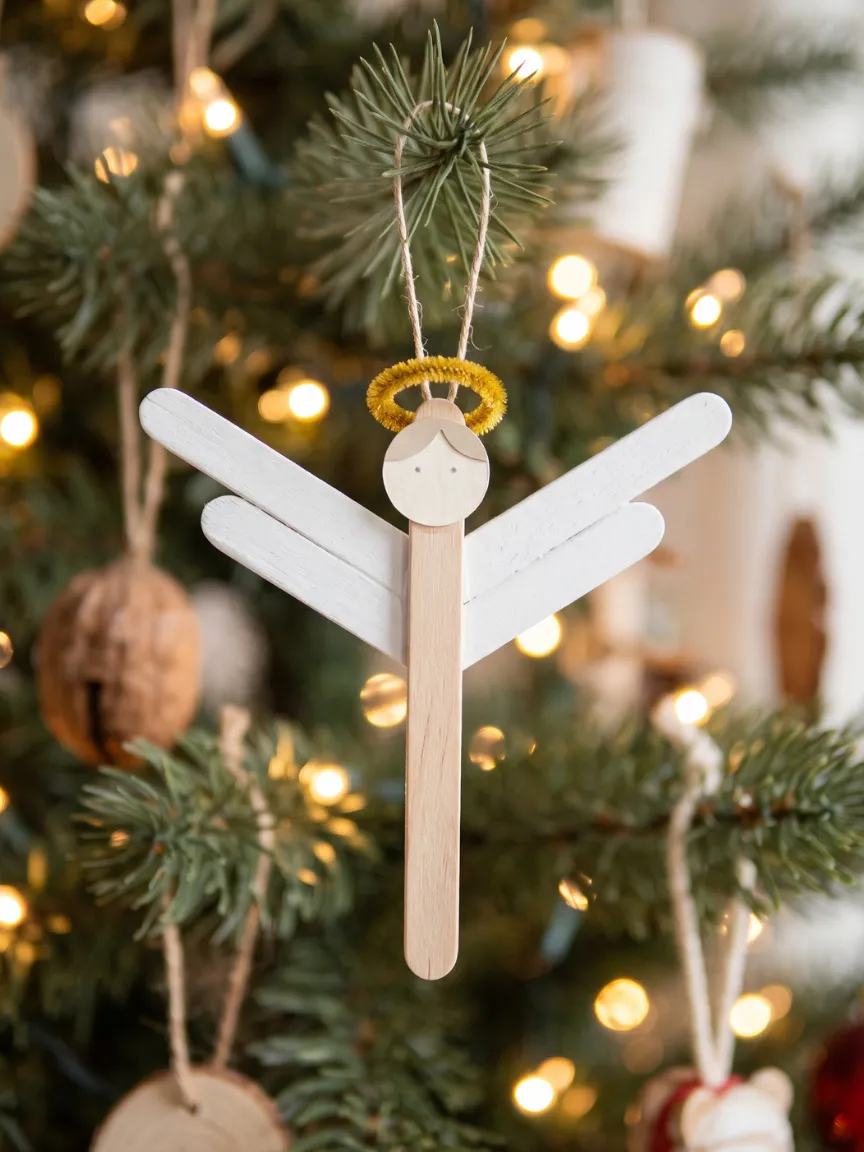
Use one vertical stick as the main body. Cut a small circle out of heavy cardstock for the head and glue it to the top. Angle two more sticks outward from the back of the body to act as wings.
Paint the wings a shimmering gold or pure white. Shape a small piece of a yellow pipe cleaner into a circle and glue it behind the head for a halo. This delicate design makes a wonderful keepsake for grandparents.
9. Snowman Stick Ornament
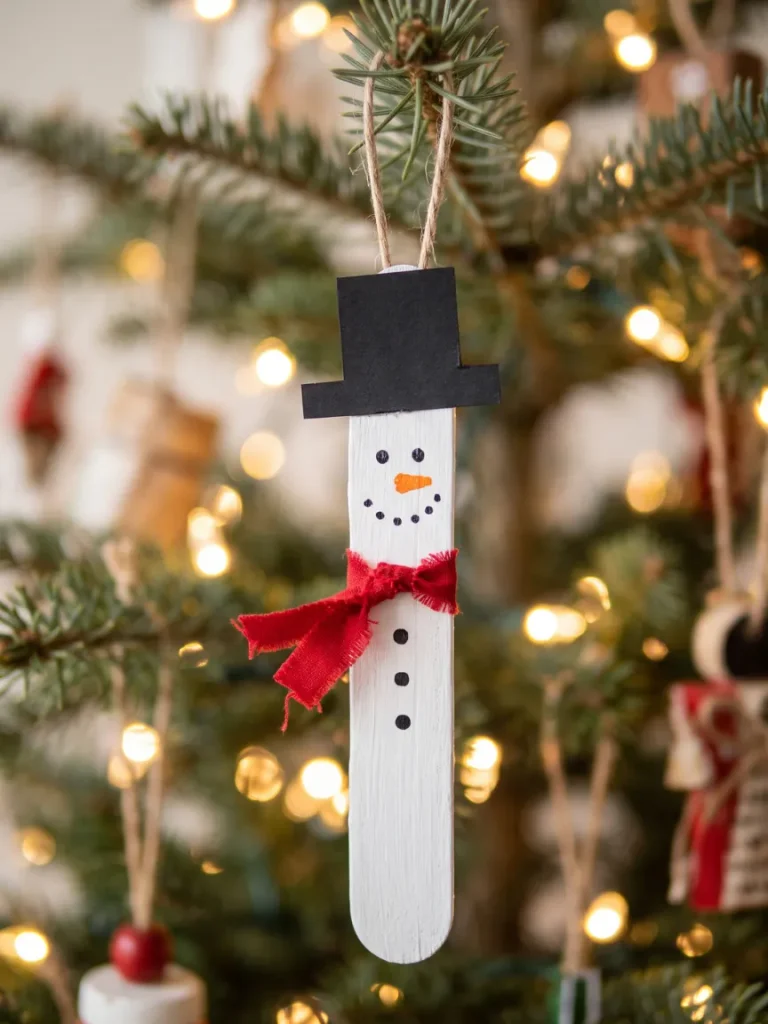
Paint a single, wide craft stick completely white to form the body of your snowman. Cut a small, proportional square out of black construction paper and glue it to the very top tip to serve as a neat top hat. Then, tie a small scrap of textured red ribbon around the upper third of the stick to create a cozy winter scarf.
Use a fine-tip black permanent marker to dot on two coal eyes and a wide, smiling mouth just above the scarf. Add a tiny dab of bright orange paint right in the center for a carrot nose. You now have a cheerful little snowman who will never melt away!
The Personal Touches
These are the ornaments that get carefully wrapped in tissue paper and saved for decades. They capture a specific moment in time and make incredible, highly personal gifts. Make sure to write the year on the back of every single one.
10. Popsicle Stick Photo Frame Ornament
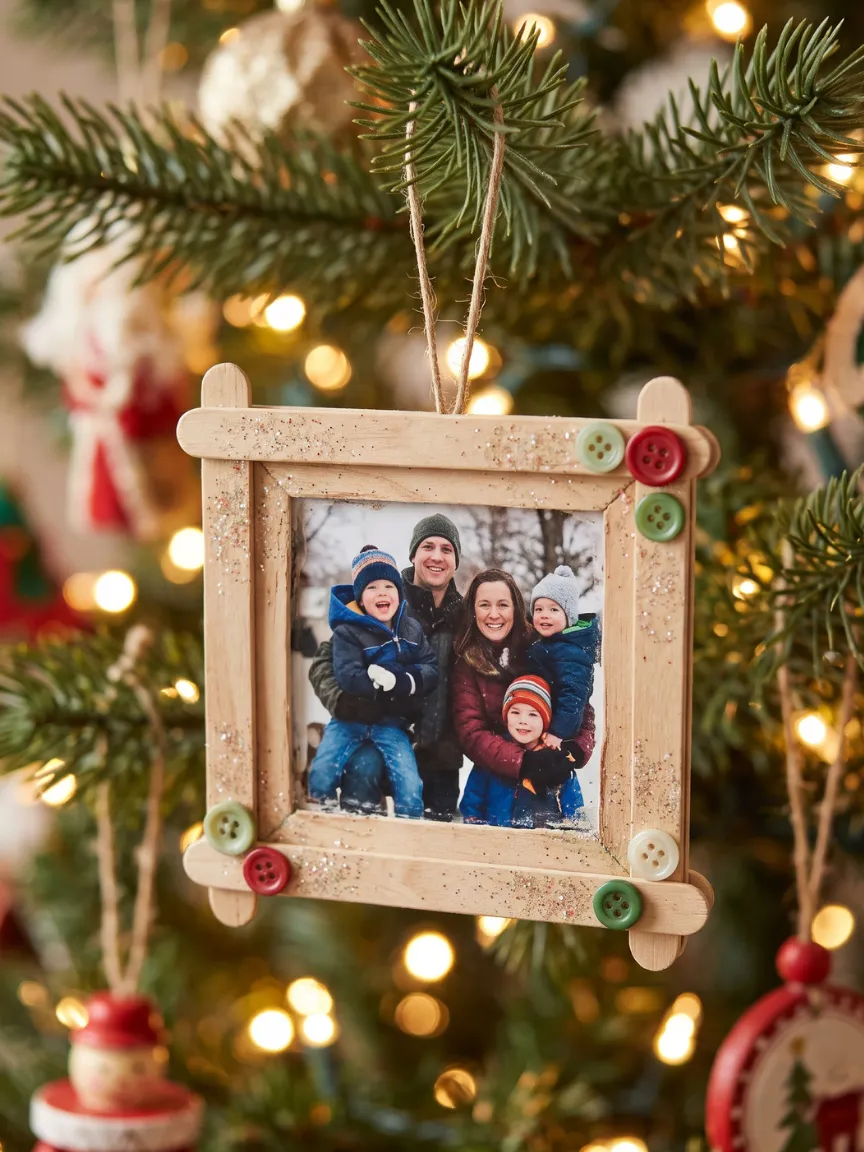
Build a simple square frame by gluing four sticks together at the corners. Trim a favorite printed photograph so it fits perfectly behind the opening. Tape or glue the edges of the photo securely to the back of the sticks.
Cut a square piece of thin cardboard and glue it over the back of the photo to keep everything rigid and protected. Decorate the front of the wooden frame with glitter, buttons, or tiny painted holly leaves.
11. Popsicle Stick Name Ornament
Write each family member’s name in neat lettering on a freshly painted stick. Drill a tiny hole at the top, or securely glue a ribbon loop to the back. Add the current year in the bottom corner.
This is a brilliant way to establish a yearly tradition as your family grows. A custom name ornament also makes a highly appreciated, low-cost gift for classroom teachers and neighborhood friends.
12. Handprint or Fingerprint Ornament
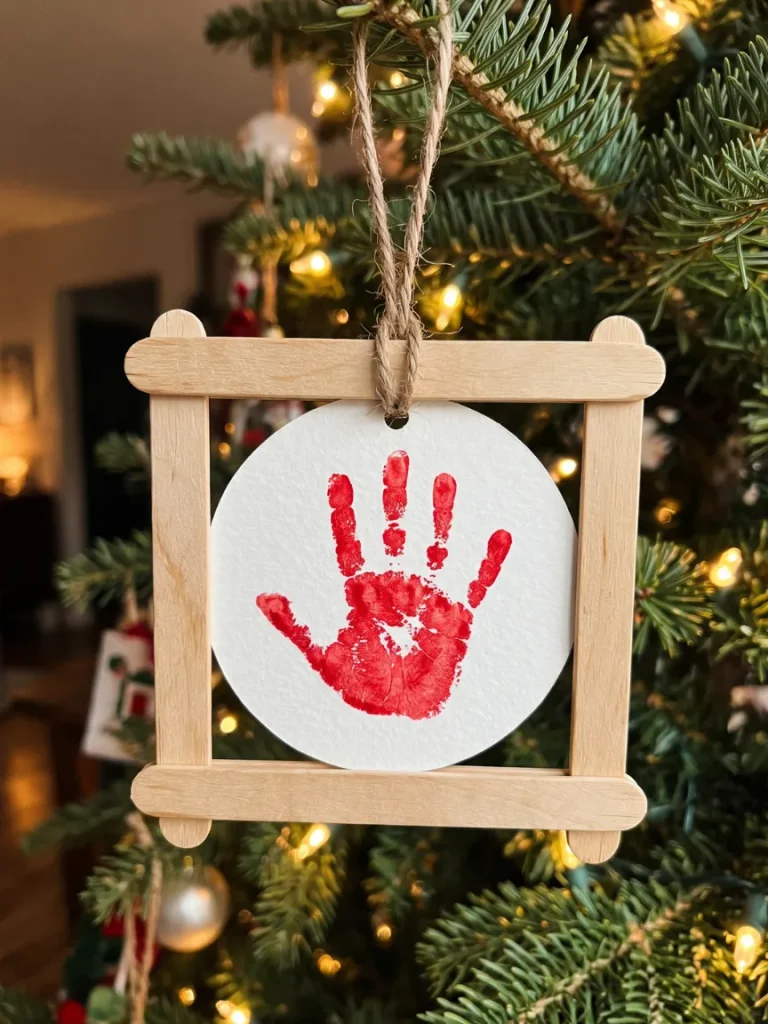
Glue four sticks into a square frame. Cut a circle of heavy white paper that fits just inside the opening. Paint your child’s thumb or palm, and press it firmly into the center of the paper circle.
Once the paint dries, glue the paper to the back of the wooden frame. Write the child’s name, age, and the exact date on the back of the paper. These capture tiny hands perfectly and become highly sentimental very fast.
13. Mini Memory Box Ornament
Build a small, open-frame box by stacking and gluing six or seven sticks directly on top of each other. Glue a solid piece of cardboard to the back to close off the box. Tuck a tiny, meaningful keepsake inside the opening.
You can frame a movie ticket stub, a scrap of a baby blanket, or a pressed flower from your garden. Paint the outside edges in your favorite color to make the memory truly pop on the tree.
The Grown-Up Options
Popsicle stick crafts are not just for kindergarten classrooms. With the right finishes, these simple wooden pieces transform into stunning, high-end accents. If you want to integrate these seamlessly with your home, browse through some elevated Christmas decor ideas to find your perfect color palette.
14. Rustic Farmhouse Star
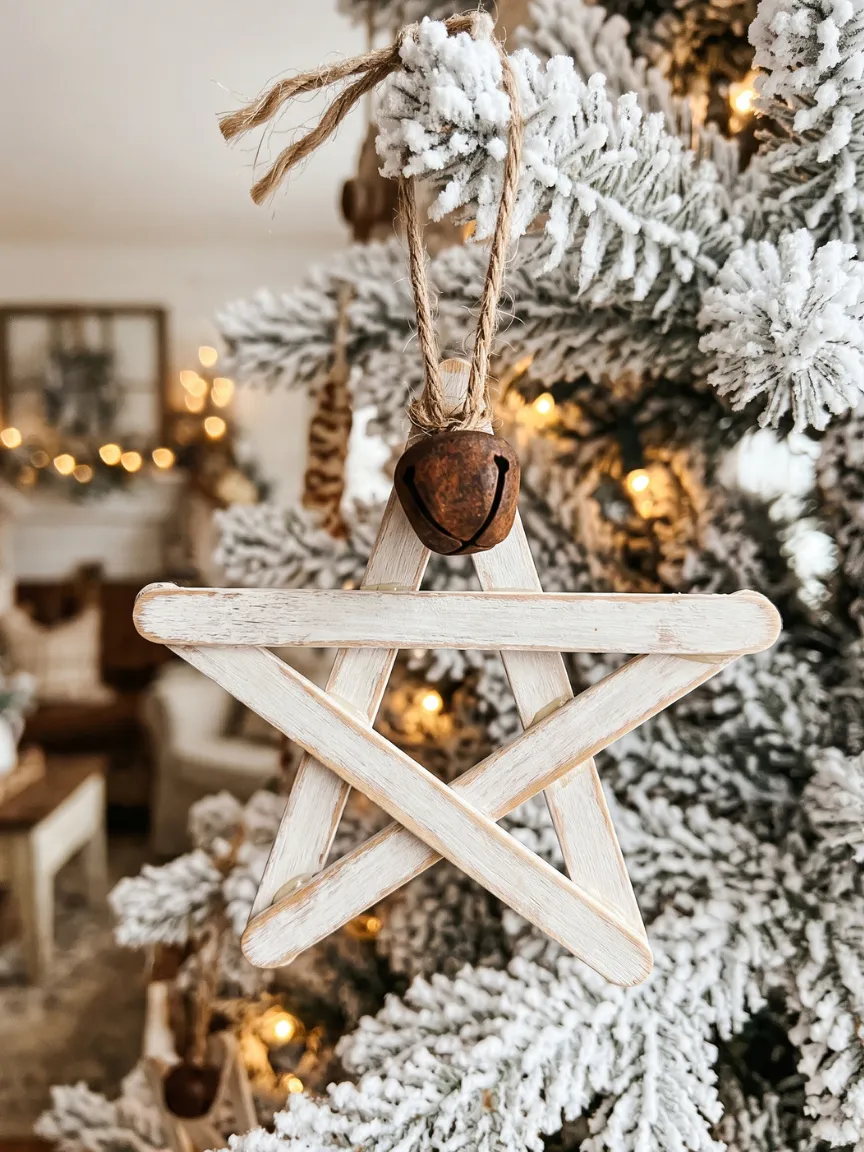
Skip the bright primary paints and reach for a subtle whitewash instead. Lightly sand the edges of your sticks to expose the raw wood beneath, creating a weathered texture. Glue them into a simple five-point star and attach a rough twine loop for hanging.
To finish the look, tie a tiny rusty jingle bell to the top point. This minimalist design looks completely at home on a flocked tree or hung in a kitchen window. It costs pennies to make but looks exactly like a boutique find.
15. Geometric Metallic Snowflake
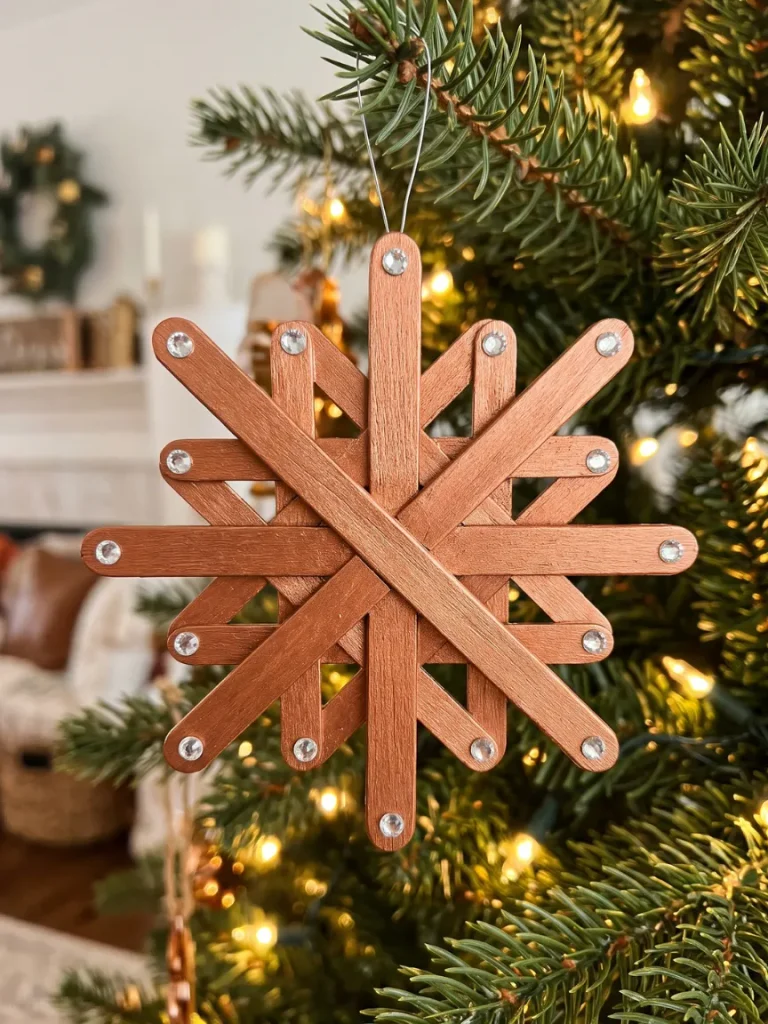
Layer six or eight sticks into a highly detailed, overlapping geometric snowflake pattern. Take your time ensuring the angles are perfectly symmetrical before the glue sets. Paint the entire structure in a rich metallic copper or dark bronze.
Carefully attach tiny, clear rhinestones at the very tips of the sticks using a toothpick and strong craft glue. This piece takes patience and a steady hand, but the payoff is a heavy, tree-worthy statement piece.
Pro Tips for Hanging and Storing
Nothing is sadder than a beautiful ornament dropping off the tree and shattering on day two. Tie a tight loop of ribbon or twine, and glue it securely to the back of the ornament. For heavy designs, sandwich the bottom of the loop between two craft sticks for ultimate reinforcement.
Once your paint and decorations are totally dry, seal the entire ornament with a clear acrylic spray or a coat of Mod Podge. This protects the wood from warping and traps the glitter so it stays on the ornament instead of migrating into your carpets. Just remember never to soak the finished pieces in water.
When the season ends, wrap each stick ornament individually in plain tissue paper. Store them in a hard plastic bin in a dry, climate-controlled closet. Damp basements will warp the wood, and hot attics will melt the hot glue right off the joints.
Clear Off the Craft Table and Get Started
You absolutely do not need to tackle all 15 of these designs today. Pick just one, grab a handful of wooden sticks, and give it a try this weekend. Once the glue is out and the creative energy starts flowing, you will likely end up making a whole batch.
Grab your supplies, lay down some newspaper, and let your imagination take over. Whether you are building a wonky reindeer or a metallic geometric star, the time spent making them is just as valuable as the finished product.