You know that feeling when you walk into a room and the wallpaper just screams “1987”? We’ve all been there. Maybe you inherited outdated patterns when you bought your house, or you’re finally ready to refresh that guest room that’s been haunting you for years. Here’s the good news: removing old wallpaper doesn’t have to be the nightmare everyone warns you about.
I’ll be honest—my first wallpaper removal project was a mess. I went in with just a scraper and determination, and three hours later, I’d made about two square feet of progress. But here’s what I learned: with the right approach and a few smart tricks, you can strip an entire room in an afternoon without destroying your walls or your sanity. Let me walk you through exactly how to do it.
Getting Your Space Ready (Trust Me, Don’t Skip This Part)
Before you start tearing into that wallpaper, let’s talk prep. I learned this the hard way when I got adhesive remover all over my mom’s hardwood floors. Not my finest moment.
First things first, clear the room as much as possible. Move furniture to the center or, even better, into another room entirely. You’ll need to access every inch of those walls, and nothing’s worse than dancing around a couch while trying to scrape.
Protect your floors with drop cloths. The HDX Drop Cloth is waterproof and catches all the gunk that’s about to come off your walls. Tape it down with ScotchBlue Painter’s Tape so it doesn’t slide around. While you’re at it, tape off your baseboards, door frames, and any electrical outlets. Turn off the power to those outlets too—water and electricity are not friends.
Gather your arsenal. You don’t need a ton of fancy equipment, but having the right tools makes this so much easier:
- A scoring tool (the Hyde Wallpaper Scoring Tool is my go-to)
- Spray bottles for your removal solution
- Putty knives or scrapers (Stanley makes a sturdy one that won’t bend)
- Sponges and cleaning cloths
- A bucket for mixing solutions
- Safety goggles and gloves (because chemistry and scraping can get messy)

The Three Methods That Actually Work
Here’s where it gets interesting. You’ve got three main options for tackling wallpaper removal, and honestly? They all work. It just depends on what you’re dealing with and what you’ve got on hand.
Method 1: DIY Solutions (Budget-Friendly and Eco-Conscious)
This is my favorite approach because it uses stuff you probably already have. Mix equal parts white vinegar and hot water in a spray bottle. Some people swear by adding fabric softener instead of vinegar—about 1 part fabric softener to 2 parts water. Both work beautifully and won’t break the bank.
Here’s the technique: Score the wallpaper first with your scoring tool. Those little perforations let your solution soak through to the adhesive underneath. Spray generously until the paper is saturated—we’re talking dripping wet. Wait 15-20 minutes. I know it’s tempting to start scraping immediately, but patience here saves you so much elbow grease later.
When you start scraping with your putty knife, hold it at about a 30-degree angle. The paper should lift off in satisfying strips. If it’s not coming easily, spray more solution and wait another 10 minutes.
Method 2: Chemical Removers (For the Stubborn Stuff)
Sometimes DIY solutions just can’t cut through decades-old adhesive. That’s when I reach for something like DIF Wallpaper Stripper Solution or Piranha Gel Wallpaper Remover. The gel formulas are particularly good for textured walls because they cling instead of running down.
Important: These products are strong. Wear those gloves and goggles, and crack a window for ventilation. Apply according to the directions (usually with a sponge or spray), let it penetrate for the recommended time—typically 15-30 minutes—and then scrape away.
The Piranha gel is especially great for those nightmare scenarios where you’ve got multiple layers of old wallpaper. It’s pricier than vinegar, sure, but when you’re facing wallpaper that’s been painted over (yes, people do that), it’s worth every penny.
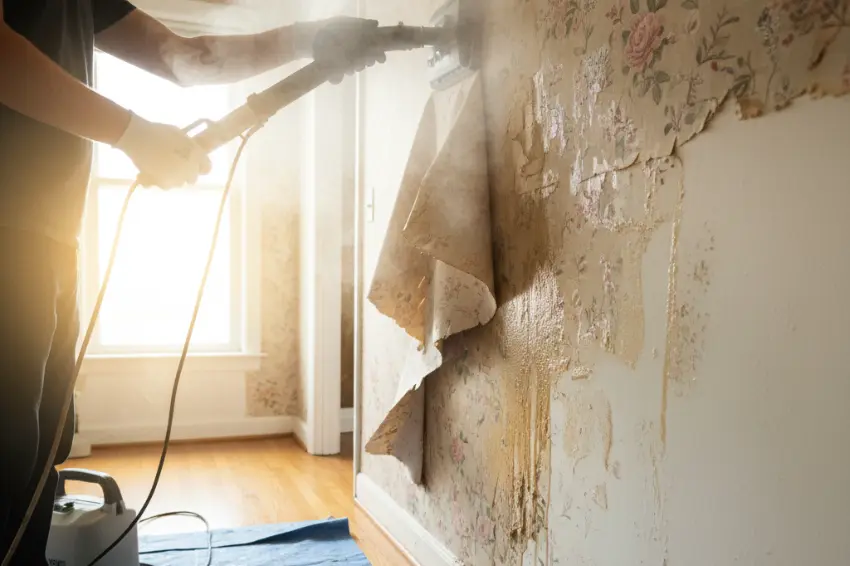
Method 3: Steaming (The Pro Move)
If you’re tackling a whole house or dealing with really stubborn wallpaper, a steamer might be your best friend. The Wagner Power Steamer is an investment, but it makes the job incredibly fast. The hot steam penetrates through the wallpaper and melts the adhesive, so the paper practically falls off the wall.
How to use it: Hold the steamer pad against the wall for about 30 seconds, then move to the next section while you scrape the loosened area. It’s almost therapeutic once you get into a rhythm. Just be careful—that steam is hot. Keep your face back and wear long sleeves if you’re sensitive to heat.
Tackling Different Wallpaper Types
Not all wallpaper is created equal, and that affects your removal strategy.
Peel-and-stick or modern vinyl wallpaper is usually the easiest. Start at a seam or corner, and often you can just pull it off by hand. If there’s residue left behind, a little warm soapy water usually handles it.
Traditional paper wallpaper needs scoring and soaking. This is where your DIY solutions shine.
Textured or fabric wallpaper is the boss level. Score carefully so you don’t damage the wall underneath, use gel removers that stick to vertical surfaces, and be prepared for multiple applications.
Double-layered or really old wallpaper might have been there since the Carter administration. Sometimes you’ll remove the top decorative layer and find another layer underneath. Don’t panic—just repeat the process. The second layer is usually easier because it’s older and the adhesive has degraded more.
The Scoring Question: To Score or Not to Score?
Short answer: yes, score. But gently.
Scoring creates tiny perforations that let your removal solution reach the adhesive layer. Without it, you’re just wetting the surface, and water-resistant wallpapers will laugh at your efforts. The Hyde Wallpaper Scoring Tool has little wheels that perforate without gouging your drywall.
The technique: Use light pressure and work in overlapping circles. You want to perforate the wallpaper, not shred your walls. If you’re working with delicate plaster walls, be extra gentle—maybe even skip scoring and just soak longer with a stronger solution.
Dealing With the Adhesive Aftermath
You’ve stripped the wallpaper. Congratulations! But now you’ve got a wall covered in sticky residue. Don’t even think about painting over that—your paint will peel faster than you can say “home renovation disaster.”
For adhesive removal:
- Mix warm water with a splash of dish soap
- Sponge it onto the residue and let it sit for a few minutes
- Scrub with a Bona Cleaning Sponge (won’t scratch your walls)
- For stubborn spots, a Mr. Clean Magic Eraser works wonders
- Rinse with clean water and let everything dry completely
Some people swear by fabric softener solution for this step too. Whatever you use, you want walls that feel smooth and clean when you run your hand over them.
Protecting Your Walls: The Damage Question
Let’s address the elephant in the room: will this damage your drywall?
It shouldn’t, if you’re careful. The key is keeping things wet enough that the adhesive softens, so you’re not scraping with brute force. If your scraper starts catching on the drywall paper, stop. Re-wet the area and wait longer.
Plaster walls are actually more forgiving than drywall in some ways—they’re harder. But they can also crack if you’re too aggressive. Patience is your friend here.
If you do accidentally gouge the wall (hey, it happens), don’t stress. A little joint compound or spackle will fix it right up before you paint.
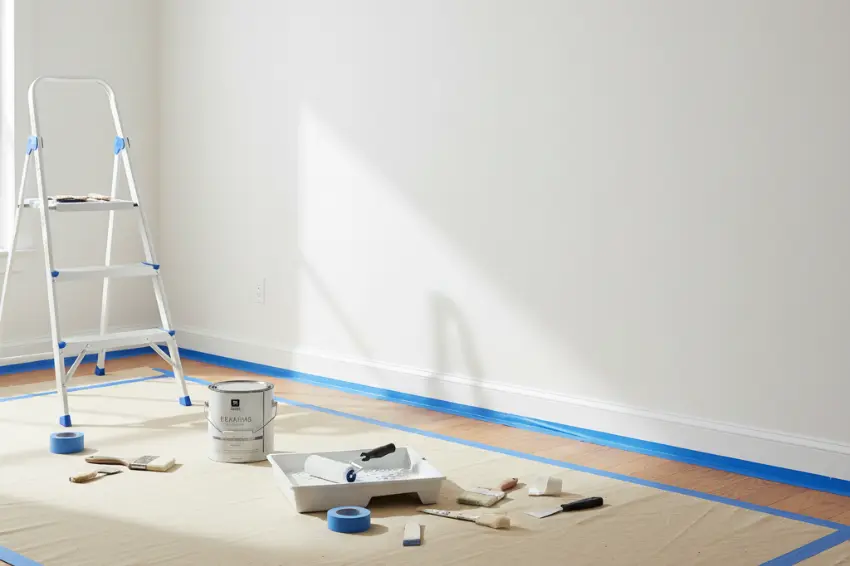
Getting Ready to Paint
You’re almost there! But don’t grab that paintbrush just yet.
Wall prep checklist:
- Wash down the entire wall with a TSP substitute cleaner
- Fill any gouges or holes with spackle
- Sand rough spots smooth once the spackle dries
- Prime with a quality primer like Kilz Primer
That primer step is crucial. It seals the wall, covers any remaining adhesive stains, and gives your paint something to grip onto. Skip it and you might see yellowing or peeling later.
My Favorite Time-Saving Hacks
After doing this more times than I can count, here are the tricks that have saved me hours:
The shop towel method: For really stubborn wallpaper, soak blue shop towels in your removal solution and press them against the wall. Cover with plastic sheeting to keep them from drying out. Leave for 30 minutes. The extended contact time works miracles.
Work from top to bottom. Gravity helps pull loosened paper down, and you won’t drip solution on areas you’ve already cleaned.
Start with a test area. Pick an inconspicuous spot and try your chosen method there first. It’ll tell you how long to soak and how easily your particular wallpaper will come off.
Remove outlet covers with a precision screwdriver set. It’s so much easier to get wallpaper off cleanly around outlets when the covers are gone. Just remember to turn off the power first!
Tools and Products Comparison
| Product Type | Best For | Price Range | Eco-Friendly? |
|---|---|---|---|
| DIY Vinegar/Fabric Softener | Light to medium adhesive, budget projects | $ | Yes |
| DIF Liquid Stripper | Standard wallpaper, large areas | $$ | Moderate |
| Piranha Gel Remover | Stubborn, multiple layers, textured walls | $$$ | Moderate |
| Wagner Steamer | Whole-house projects, professional results | $$$$ | Yes (no chemicals) |
| Scoring Tool | All wallpaper types | $ | N/A |
| Quality Scrapers | All projects | $-$$ | N/A |
When to Call It and Try a Different Approach
Sometimes a method just isn’t working. If you’ve soaked and scraped the same spot three times with no progress, switch tactics. Vinegar not cutting it? Try a gel remover. Solution not penetrating? Break out the steamer. There’s no shame in pivoting—I’ve used all three methods on the same room before when I discovered layers of different wallpaper types.
Your Fresh Start Awaits
Removing old wallpaper is absolutely one of those projects that seems scarier than it actually is. Sure, it’s not the most glamorous DIY task, but there’s something incredibly satisfying about peeling away decades of outdated patterns and revealing a fresh, clean wall underneath.
The best part? Once you’ve done it once, you’ll realize it’s totally manageable. You’ve got multiple methods to choose from depending on your budget and the condition of your walls. Whether you go the eco-friendly DIY route with vinegar, invest in a steamer for speed, or reach for a commercial remover for stubborn adhesive, you can absolutely do this.
Remember: preparation is everything, patience is your best tool, and when in doubt, let solutions soak longer rather than scraping harder. Your walls will thank you, and in a day or two, you’ll be looking at a beautifully painted room wondering why you didn’t tackle this project sooner.
Ready to get started? Grab your supplies, put on some good music, and show that outdated wallpaper who’s boss. And hey—when you’re done, snap a before-and-after photo. You’re going to want to remember this transformation!
Frequently Asked Questions
What if my wallpaper was installed directly on unpainted drywall?
This is a trickier situation that wasn’t covered in detail above. Wallpaper applied directly to unpainted drywall often bonds to the paper facing of the drywall itself. In this case, you’ll need to be extra gentle and keep the wall very wet. Work in small sections and accept that you might need to skim-coat the entire wall afterward. Sometimes the drywall paper comes off with the wallpaper—if this happens, apply a stain-blocking primer immediately to prevent bubbling, then use joint compound to create a new smooth surface.
How do I remove wallpaper from textured walls without damaging the texture?
Here’s the trick: use a gel-based remover (like Piranha) because it clings to vertical surfaces and won’t pool in the texture’s crevices. Skip the scoring tool entirely or use it with the lightest possible touch—you don’t want to flatten your texture. Use a wide plastic scraper instead of metal, and work with the texture pattern, not against it. Apply multiple light treatments rather than one aggressive session.
Can I use a heat gun instead of a steamer?
While a heat gun might seem like a good substitute, I’d caution against it. Heat guns get much hotter than steamers and can scorch your walls, release toxic fumes from old wallpaper adhesives, or even start fires if you’re not careful. Steamers are designed specifically for this job—they use moisture to loosen adhesive, not just heat. If you’re looking for a budget option, stick with liquid solutions rather than risking a heat gun.
What’s the deal with wallpaper that’s been painted over?
Oh, this is everyone’s nightmare scenario. When someone paints over wallpaper, they’ve essentially created a moisture barrier. You’ll need to score more thoroughly (the paint layer needs perforations), and you’ll likely need a stronger chemical remover like DIF or Piranha Gel. The process takes longer—sometimes 2-3 applications—because the solution has to penetrate both the paint and the wallpaper. Be prepared for this to be a multi-day project, and you might need to remove the paint and wallpaper as a single thick layer.
How can I tell if there’s asbestos in my old wallpaper or adhesive?
Any wallpaper or adhesive installed before the 1980s could potentially contain asbestos. You can’t tell just by looking—you’d need to send a sample to a lab for testing (costs around $30-50). If your house was built before 1980 and you’re concerned, consider hiring an asbestos abatement professional. If you choose to proceed yourself and the wallpaper is in good condition, keeping everything wet during removal minimizes any risk of releasing fibers. Never sand or scrape dry wallpaper in older homes.
My walls are now stained yellow or brown after removing the wallpaper. Will paint cover this?
Those stains are usually water damage, tannins from old adhesive, or discoloration from the original wallpaper bleeding through. Regular paint won’t cover them—they’ll bleed right through and reappear like a bad dream. The solution is a stain-blocking primer like Kilz Original or BIN Shellac-based primer. Apply 1-2 coats of the stain-blocking primer, let it dry completely, then paint as normal. Don’t skip this step—I learned the expensive way when I had to repaint an entire room after trying to take a shortcut!